• Skip to primary navigation
  • Skip to main content
  • Skip to primary sidebar
  • Skip to footer
Joy the Baker
Joy the Baker
  • New Magazine!
  • Bread
  • Cookies
  • Cakes
  • Pies
  • Recipes
    • All Recipes
    • Biscuits
    • Muffins
    • Cupcakes
    • Drinks
    • Breakfast
    • Lunch
    • Dinner
    • Fruit
    • Nuts
    • Buttermilk
    • Chocolate
    • Vanilla
    • Holiday
    • Healthy
    • Gluten-Free
    • Vegan
  • Blog
    • Baking 101
    • Tips
    • Beyond the Kitchen
    • Let It Be Sunday!
    • New Orleans

BAKEHOUSE LIVE: Puff n’ Stuff Puff Pastry

Jump to Recipe

Friends! I’m so happy you’re joining me at The Bakehouse for a weekend of puff pastry!  This is a true baking adventure.  We’ll pray to the baking gods, keep the kitchen cool, roll and fold, roll and fold. 

On Saturday we’ll gather to make the puff pastry from start to finish.  We’ll need the full three hour class time, but there are several 20-30 minute breaks built in where we’ll allow the dough to chill.  This means we’ll have plenty of time for deep breaths and coffee (or mimosa) refills. 

The puff pastry recipe is below. It’s a great idea to print out the recipe and measure your ingredients by weight and have them ready to go before class begins. 

Equipment you’ll need for class: 

•  stand mixer with both a dough hook and paddle attachment

• parchment paper and plastic wrap

•  small offset spatula (though if you only have a butterknife that’s fine too)

•  a pastry brush

•  French or tapered rolling pin 

Print
clock clock iconcutlery cutlery iconflag flag iconfolder folder iconinstagram instagram iconpinterest pinterest iconfacebook facebook iconprint print iconsquares squares iconheart heart iconheart solid heart solid icon

BAKEHOUSE LIVE: Puff n’ Stuff Weekend

  • Author: Adapted from pastry queen Erin McDowell
Pin Recipe
Print Recipe

Description

Puff pastry is all about temperature and feel. We’ll spend some time chilling the dough to pliable after each roll and fold. 


Ingredients

Scale

Dough

  • 3 1/3 cups (400 grams) bread flour
  • 1 2/3 cups (200 grams) all-purpose flour
  • 1 1/2 teaspoons (9 grams) fine sea salt
  • 1 teaspoon (6 grams) granulated sugar
  • 1/2 cup (113 grams) unsalted butter, at room temperature, cut in three chunks
  • 1 cup plus 3 tablespoons (287 grams) cool water
  • 1 teaspoon apple cider vinegar

Butter block

  • 1 pound (453 grams) unsalted butter, at cool room temperature
  • 2/3 cup (71 grams) bread flour

Instructions

  1. Make the dough: In the bowl of a stand mixer fitted with the dough hook, mix the bread flour, all purpose flour, salt, and sugar to combine. Add the butter and mix on low speed until it is fully incorporated and the mixture looks a little crumbly (like pie crust), about 1 minute. Add the water and vinegar and mix until the dough comes together, 4 minutes. Raise the speed to high and mix for 1 to 2 minutes more, until the dough is smooth and gathers around the dough hook.
  2. Turn the dough out onto a work surface and form into a rough rectangular shape. Wrap tightly in plastic wrap and chill for about 30 minutes.
  3. Next, make the butter block: In the same stand mixer bowl—this time fitted with the paddle attachment, mix the butter and flour until well combined. Scoop the mixture onto the lower third of a piece of parchment paper (cut the size of a baking sheet) and use a small offset spatula to spread it into a rectangle about ½-inch thick (about 6 by 9 inches). Fold the upper part of the parchment paper down over the butter block—you can use the paper to help you square off the edges. Transfer to the refrigerator–monitor until it is firm but pliable (about 65°F to 70°F). It should be able to gently bend without breaking. Allow to chill for 20-30 minutes. 
  4. When the dough and butter block are both chilled, but flexible, it’s time to lock the butter inside the dough. On a lightly floured surface, roll the dough out into a rectangle slightly wider than the butter block, and twice the length (about 12 by 10 inches). If necessary, turn the rectangle so that one of the shorter ends is facing you.
  5. Peel the paper back from the top of the butter block, leaving it on the paper so that you can use it to help you guide it onto the dough. Invert it onto the bottom half of the dough, positioning it so that there is a ½-inch margin of dough around the sides and bottom of the butter block. Gently stretch the top portion of the dough to fold it down over the butter block so that it meets the opposite edge of the dough. Press the edges of the dough together firmly all the way around to seal, then fold the excess dough at the bottom and edges under itself. You should now have a firm, but pliable rectangular package of dough (about 6 by 10 inches) enveloping the butter block. If the dough feels soft, refrigerate the dough for 15 to 20 minutes before proceeding. Otherwise, proceed with Fold 1.
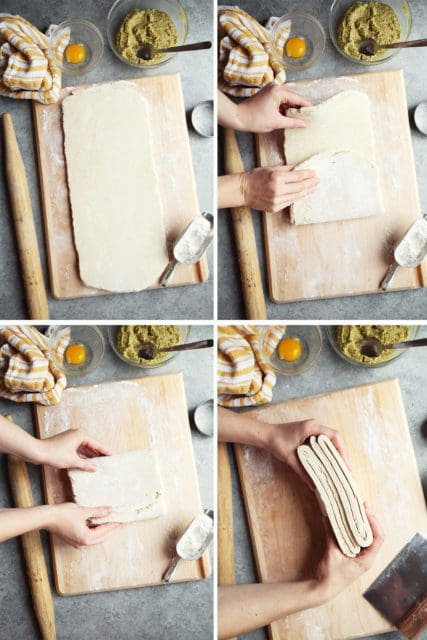
  6. Fold 1: On a lightly floured surface, roll the dough out to a rectangle about ½-inch thick. If you’re having a hard time rolling the dough, it might be to cold—let it stand at room temperature for 5 to 15 minutes. If the dough feels soft or squishy or melty butter is breaking through, it may be too warm, and may need more time in the refrigerator to firm up.
  7. Position the dough so one of the shorter sides is facing you. The first fold is called a “four fold.” Fold the top portion of the dough about three-quarters of the way over the dough. Fold the bottom portion one quarter of the way over the dough so it meets the left edge (it should look like an open book with an off-center spine). Fold the larger side over the smaller side (essentially folding in half), then wrap and refrigerate for 20 to 30 minutes.
  8. Fold 2: On a lightly floured surface, roll out the dough to a rectangle about ½-inch thick. The next fold is called a “three fold.” Face the dough so that one of the shorter sides of the rectangle is facing you. Fold the top portion of the dough about on third of the way over the dough. Do the same with the right edge, folding it one third of the way over, resting it on top of the other piece just folded (like the way you’d fold a standard piece of paper to fit into an envelope). Wrap and refrigerate for 20 to 30 minutes.
  9. Fold 3: Repeat steps 6 through 7 to perform another “four fold.”
  10. Fold 4: Repeat step 8 to perform another “three fold.”
  11. After the final fold, the dough should be tightly wrapped in plastic wrap and refrigerated for at least 12 hours before using (and up to 2 days). For longer storage, it can be frozen for up to 3 months (thaw overnight in the refrigerator before using).

Did you make this recipe?

Share a photo and tag us — we can't wait to see what you've made!

Primary Sidebar

Fresh baked emails, delivered to your inbox

Jump to Recipe

Receive recipes from Joy the Baker and updates on events at The Bakehouse.

HI! I’M JOY!

Jump to Recipe

Welcome! This has been my little corner of the internet since 2008!

I’m a baker, photographer, cookbook author and teacher.  I live laugh love in New Orleans. 

MORE ABOUT JOY AND THE TEAM

BOOKS + Magazines

Jump to Recipe

JOY THE BAKER 2022 SUMMER MAGAZINE

JOY THE BAKER 2021 HOLIDAY MAGAZINE

JOY THE BAKER 2020 HOLIDAY MAGAZINE

HOMEMADE DECADENCE

OVER EASY: SWEET AND SAVORY RECIPES FOR LEISURELY DAYS COOKBOOK

JOY THE BAKER COOKBOOK

Jump to Recipe

Joy the baker with dyed bandana around neck

HOW TO MAKE DYED BANDANAS

as seen in JtB Magazine!

Jump to Recipe
joy the baker on facebook joy the baker on twitter pinterest-social instagram-socialbloglovin-social

JOY @ WILLIAMS SONOMA

Jump to Recipe

SHOP THE CAKE LINE OF CAKE MIXES!

DRAKE ON CAKE

Jump to Recipe

Passionate from miles away since 2015.

Check it out on Instagram

Drake on cake instagram.


FAVORITE FRUIT RECIPES

strawberry sheet cake on a plate with strawberries on top.

My Favorite Super Easy Strawberry Sheet Cake

Berry crostata topped with whipped cream with coffee.

A Single Serve Berry Crostata Recipe

fresh baked blueberry cobbler on a plate with vanilla ice cream on top.

The Secrets To My Favorite Blueberry Cobbler

POPULAR CAKES

strawberry sheet cake on a plate with strawberries on top.

My Favorite Super Easy Strawberry Sheet Cake

Slice of coconut cake on small white plate with coffee.

My favorite Coconut Cake is actually made with cake mix

A slice of lemon blueberry gooey butter cake held on a cake slicer.

Lemon Blueberry Gooey Butter Cake

Footer

Instagram

joythebaker

📚Baker and author of books and magazines
🎂Creator @drakeoncake
💁🏻‍♀️Classes with me @thebakehousenola
🍰 Products with @williamssonoma

joythebaker
My EASIEST Strawberry Sheet Cake is also my absolu My EASIEST Strawberry Sheet Cake is also my absolute favorite. Get into a box of white cake mix and fresh 🍓🍓 purée! Topped with a thick layer of strawberry cream cheese frosting - this cake is a little pink dream! ⁣
⁣
The Easiest Strawberry Sheet Cake recipe linked in the bio for you! 💋
Our resident reader, @tobyfels shares my favorite Our resident reader, @tobyfels shares my favorite list of the summer on Joy the Baker this year: The Best Books for Summer 2022!  As a person who reads Beach Reads all year long, this is IT! With titles by @ashleymcoleman_ @anarasong @annleary @bonnie_garmus_author @heyashposton @annabelmonaghan @greerhendricks @sarahpekkanen @shelbyvanpeltwrites @marilynsimonrothstein @@misterosman and @kirstin.chen. The guide to your bookworm summer linked in the bio!
Over here testing the limits of “you are what yo Over here testing the limits of “you are what you eat” and will soon be taking my final form as a summer tomato. ⁣🫠🍅
⁣
This Mediterranean Feta and Fresh Tomato Tart is an absolute show stopper with a buttery crisp, press-in crust, whipped feta, and layers of fresh tomato, cucumber, onions, and olives. I’ll leave the recipe linked in the bio - it’s really very special. Join me. We are 🍅🍅.
Here are my two best kept secrets for getting thro Here are my two best kept secrets for getting through this summer.  I’ve never been much for secrets so I’m letting you right in! ⁣
1.	I’m committed to folding crumbled chewy brownies into the easiest homemade no-churn ice cream.⁣
2.	I’m shopping for all of my baking and summer entertaining essentials, wine and cheese at the new @aldiusa stores opening across the Gulf Coast! Wait… you’re as obsessed with ALDI as I am, right? The shopping is always easy and affordable and I always come home with a fun treat among my essentials. Hit up my stories to see my grocery haul (and the chips I ate in the car on the way home) and head to your nearest ALDI for your summer essentials!  #ad⁣
⁣
I’ll leave the recipe and your #ALDILove grocery list linked in the bio!
Let’s just make one! ⁣ ⁣ One Single Berry Cr Let’s just make one! ⁣
⁣
One Single Berry Crostata just you for. Double the recipe (🔗 in the bio) only if you want to share. ⁣
⁣
#joythebaker #berry #crostata #smallbatch #dessert #foodblogfeed
The freezer is packed with ice cream treats from h The freezer is packed with ice cream treats from here on out, and that’s a promise. ⁣
⁣
Find this Milk and Cereal Ice Cream Bar and loads of other semi-homemade ice cream treats linked in the bio! 💓🍦🫠
Load More... Follow on Instagram

Copyright © 2022 · Joy the Baker
All rights reserved. Violators will be whupped and sent to bed with no dessert · Privacy Policy

Scroll Up