
I want to show you how to bake a pie. I’ve got step by step pictures. I’ve got instructions. I’ve got encouraging words. I’ll even hold your hand if you need me to. This isn’t anything to be scared of… but I do have a secret.
See, there’s a secret to making the best apple pie in the world. Love. Any way you can get it or give it, the secret to apple pie is love.
Love is a funny thing. (Ok, you should totally call me out- that’s just a silly thing to say.) While I don’t contend to be any sort of expert on the subject, I do take comfort in the knowledge that getting love, and giving love, without a doubt, the best feeling in the world.
I’d like to think of my apple pie as a pure and unadulterated delivery device for love.
You know how cupcakes are actually a delivery device for sweet and fluffy frosting? How cheeseburgers are just an excuse to go crazy with the french fries? How movie theater tortilla chips are merely edible spoons for gobs of fake yummy, cheesy nacho sauce? Well this apple pie, I cross my heart and hope to die, is just an excuse to pour all of my love right into a pie crust and into the oven.
It’s perfect. There isn’t a more perfect thing in the world… ok, except maybe babies and puppies and snowflakes and kate spade flats (but WHY so expensive kate!? $300, seriously!?)
I will warn you, this pie is a labor of love. It takes time. It takes commitment. It takes a personal outpouring of love and support. I’ll just say it now, there’s cutting and pressing, chilling, peeling, macerating, boiling, tossing, rolling, preheating, baking, slitting and slicing…. almost in that order.
If I haven’t yet scared you away. If you’re so full of love that you just might burst, throw it into this pie, and send it out into the world. It’s important.
It sure does sound like I’m one lovesick baker, doesn’t it? Well… some things just can’t be helped, or hidden.
Let’s make a pie together. Muster up the love. Gather together you patience. Bust out the apples. Dive in, crust first.
Buttermilk Pie Crust
2 sticks (8 ounces) cold unsalted butter
2 1/2 (12 ounces) cups all purpose flour
1 Tablespoon sugar
1 teaspoon salt
1/2 cup (5 to 6 ounces) buttermilk

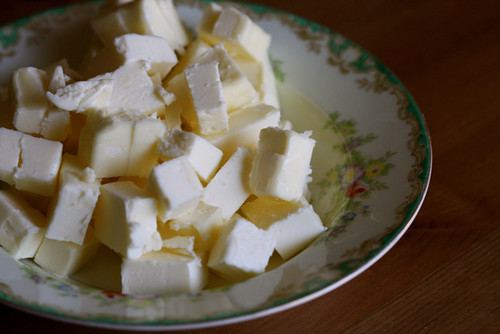
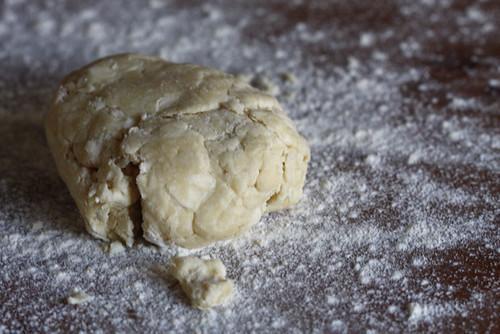
1. Cut the butter into 1-inch pieces and place in the freezer to chill for 15 minutes. Measure out the buttermilk and store in the refrigerator to keep it cold (you could even put it in the freezer for a few minutes too).

2. Sift together the flour, sugar and salt in a large bowl. Take the cold butter from the freezer and toss it with the flour mixture.
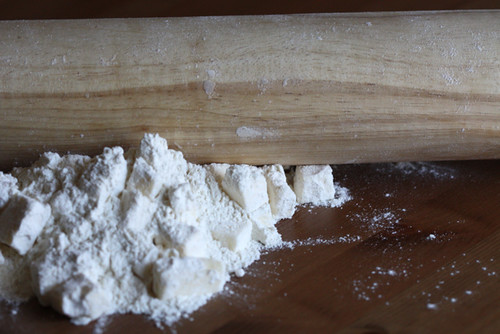
3. Dump the cold butter cubes and flour mixture onto a large work area for rolling. With a rolling pin, roll the mixture, flattening the butter cubes with the flour into long, thin, floured butter sheets. Work quickly to ensure that the butter stays cold. Below is what the rolled butter and flour look like after I’ve gathered them together on the work surface a bit.

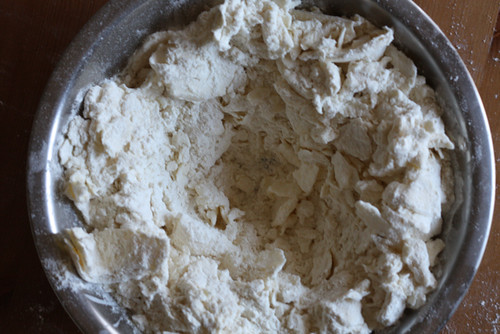
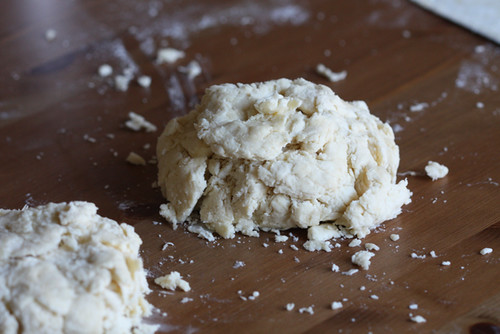
4. Place the flour and flattened butter back in the large bowl and chill for 10 minutes. When the butter is cold, remove the bowl from the refrigerator, make a small well in the center of the flour and butter mixture. Add the cold buttermilk to the bowl all at once. Begin to bring the dough together with one hand ( keep the other hand free to answer the phone). Moisten all of the flour with the milk, using your hand to break up large clumps of milk and flour. The dough will be rather shaggy, but you can add another tablespoon of buttermilk, if you see that all your flour isn’t moistened. Form the dough into two disks. The disks will be rough, and hard to shape together, but once they rest in the fridge for an hour, the moisture will redistribute and they’ll be easier to roll out.

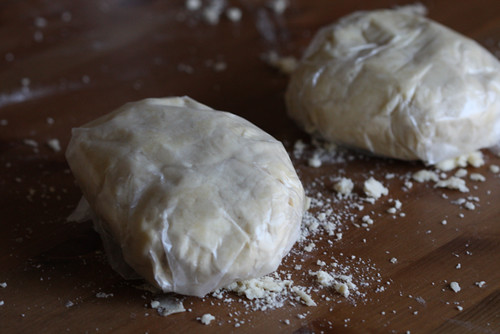
5. Chill the dough for at least an hour in the refrigerator. At this point, the dough will keep in the fridge for up to three days, or in the freezer for up to three weeks. For freezing, roll the dough out into sheets and wrap them in plastic film.
With Love, Apple Pie
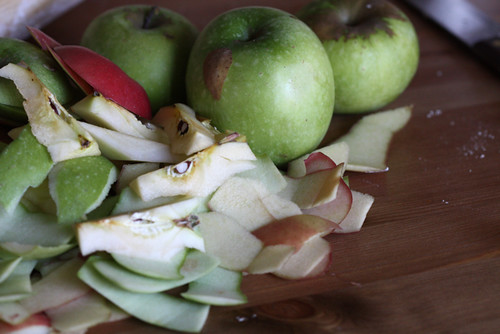
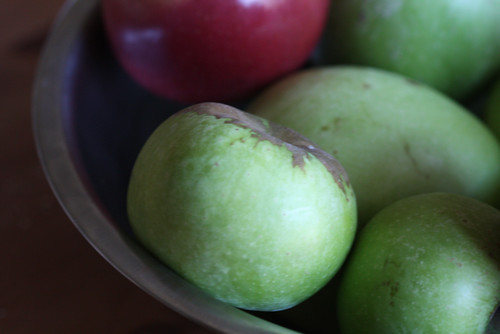
2 1/2 lbs baking apples, peeled, cored and sliced 1/4-inch thick. I used a combination of Granny Smith, Fuji and Pink Ladies.
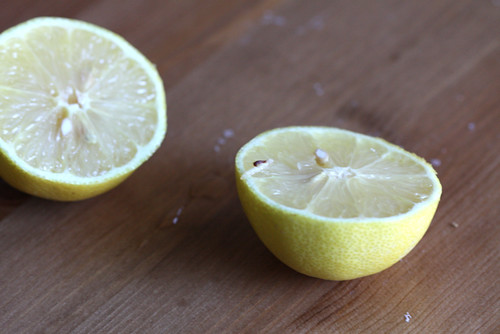
1 Tablespoon freshly squeezed lemon juice
1/4 cup light brown sugar, packed
1/4 cup granulated sugar
1/2 – 1 1/2 teaspoons ground cinnamon
1/4 teaspoon nutmeg, preferably fresh grated
1/4 teaspoon salt
2 Tablespoons unsalted butter
1 Tablespoon plus 1 teaspoon cornstarch
1. Remove the dough for the bottom crust from the refrigerator. If necessary, allow it to sit for about 10 minutes or until it is soft enough to roll.
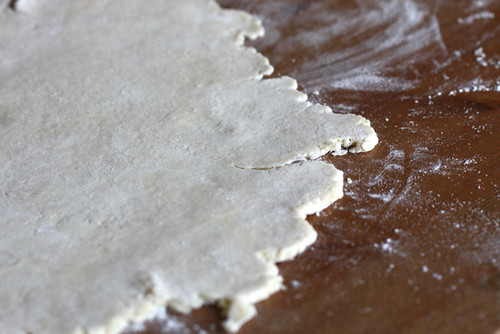
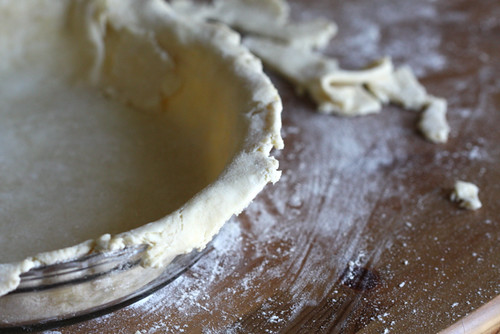
2. On a well floured surface, roll the bottom crust 1/8 inch thick or less and 12 inches in diameter. Transfer it to a pie pan. Trim the edge almost even with the edge of the pan. Cover it with plastic wrap and refrigerate it for a minimum of 30 minutes and a maximum of 3 hours.
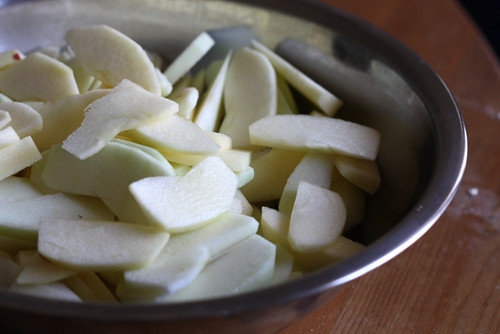
3. In a large bowl, combine the apples, lemon juice, sugars, cinnamon, nutmeg and salt and toss to mix. Cover apples and allow to macerate (develop and release juices) at room temperature for a minimum of 30 minutes and a maximum of 3 hours.
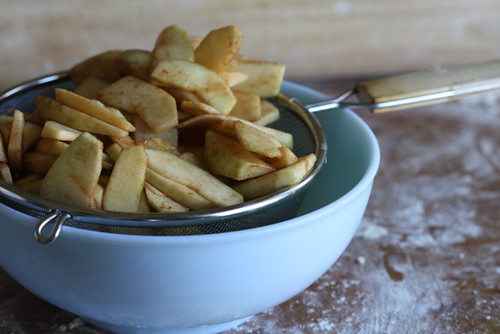
Transfer the apples and their juices to a colander suspended over a bowl to capture the liquid. The mixture will release at least 1/2 cup of liquid.
4. In a small saucepan (preferably lined with a nonstick surface), over medium high heat, boil down this liquid, with the butter, to about 1/3 cup (a little more if you started with more than 1/2 cup of liquid), or until syrupy and lightly caramelized. Swirl the liquid but do not stir it. (Alternatively, spray a 4-cup heatproof measuring cup with nonstick vegetable spray, add liquid and butter, and boil it in the microwave, 6 to 7 minutes on high.)
Meanwhile, transfer the apples to a bowl and toss them with the cornstarch until all traces of it have disappeared.

5. Pour the syrup over the apples, tossing gently (Do not be concerned if the liquid hardens on contact with the apples; it will dissolve during baking.)
6. Roll out the top crust large enough to cut a 12-inch circle.
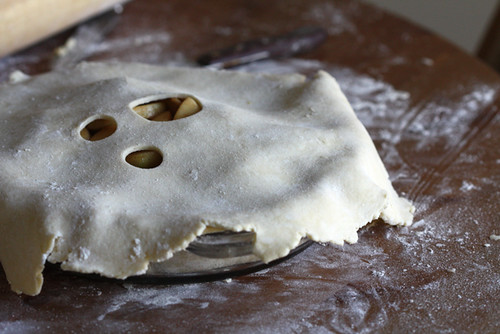
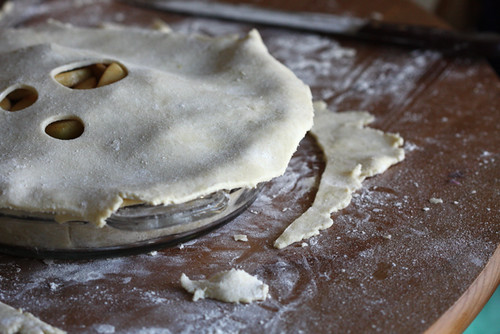
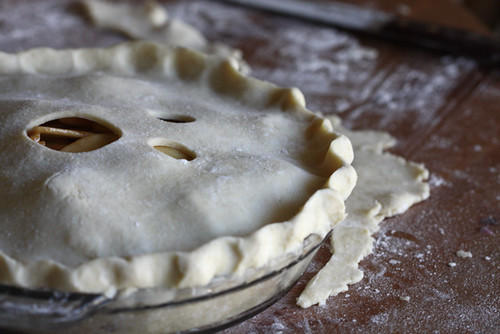
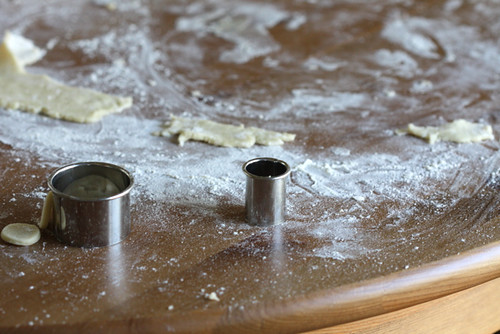
7. Transfer the apple mixture to the pie shell. Moisten the border of the bottom crust by brushing it lightly with water and place the top crust over the fruit. Trim the overhang of the top crust so that there is only 1/2-inch of overhand. Tuck the overhand under the bottom crust boarder and press down all around to seal it. Crimp the border using a fork or your fingers and make about 5 evenly spaced 2-inch slashes starting about 1 inch from the center of the pie and radiating toward the edge. I used a small circular cutter to make a few air holes on the top crust. Cover the pie loosely with plastic wrap and refrigerate it for 1 hour before baking. This will chill and relax the pastry, preventing shrinking.
8. Preheat the oven to 425 degrees F at least 20 minutes before baking. Set oven rack at the lowest level and place a baking stone or baking sheet on top of it before preheating. Place a large piece of greased foil on top of the sheet to catch any juices.
9. Brush the top crust of the pie with a beaten egg and sprinkle generously with sugar. Set the pie directly on he foil topped baking stone and bake for 45 to 55 minutes or until the juices bubble through the slashes and the apples feel tender but not mushy when a take tester or small sharp knife is inserted through a slash. After 30 minutes, protect the edges from overbrowning with a foil ring.
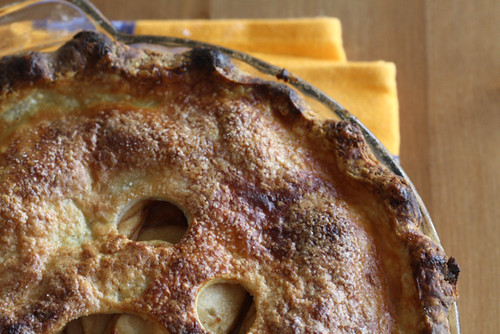
Cool the pie on a rack at least 4 hours before cutting. Serve warm or at room temperature with vanilla ice cream.
Want to copy and paste this recipe to work with in your kitchen!? Here you go!
Buttermilk Pie Crust
2 sticks (8 ounces) cold unsalted butter
2 1/2 (12 ounces) cups all purpose flour
1 Tablespoon sugar
1 teaspoon salt
1/2 cup (5 to 6 ounces) buttermilk
1. Cut the butter into 1-inch pieces and place in the freezer to chill for 15 minutes. Measure out the buttermilk and store in the refrigerator to keep it cold (you could even put it in the freezer for a few minutes too).
2. Sift together the flour, sugar and salt in a large bowl. Take the cold butter from the freezer and toss it with the flour mixture.
3. Dump the cold butter cubes and flour mixture onto a large work area for rolling. With a rolling pin, roll the mixture, flattening the butter cubes with the flour into long, thin, floured butter sheets. Work quickly to ensure that the butter stays cold. Below is what the rolled butter and flour look like after I’ve gathered them together on the work surface a bit.
4. Place the flour and flattened butter back in the large bowl and chill for 10 minutes. When the butter is cold, remove the bowl from the refrigerator, make a small well in the center of the flour and butter mixture. Add the cold buttermilk to the bowl all at once. Begin to bring the dough together with one hand ( keep the other hand free to answer the phone). Moisten all of the flour with the milk, using your hand to break up large clumps of milk and flour. The dough will be rather shaggy, but you can add another tablespoon of buttermilk, if you see that all your flour isn’t moistened. Form the dough into two disks. The disks will be rough, and hard to shape together, but once they rest in the fridge for an hour, they’ll be easier to roll out.
5. Chill the dough for at least an hour in the refrigerator. At this point, the dough will keep in the fridge for up to three days, or in the freezer for up to three weeks. For freezing, roll the dough out into sheets and wrap them in plastic film.
With Love, Apple Pie
2 1/2 lbs baking apples, peeled, cored and sliced 1/4-inch thick. I used a combination of Granny Smith, Fuji and Pink Ladies.
1 Tablespoon freshly squeezed lemon juice
1/4 cup light brown sugar, packed
1/4 cup granulated sugar
1/2 – 1 1/2 teaspoons ground cinnamon
1/4 teaspoon nutmeg, preferably fresh grated
1/4 teaspoon salt
2 Tablespoons unsalted butter
1 Tablespoon plus 1 teaspoon cornstarch
Remove the dough for the bottom crust from the refrigerator. If necessary, allow it to sit for about 10 minutes or until it is soft enough to roll.
On a well floured surface, roll the bottom crust 1/8 inch thick ofr less and 12 inches in diameter. Transfer it to a pie pan. Trim the edge almost even with the edge of the pan. Cover it with plastic wrap and refrigerate it for a minimum of 30 minutes and a maximum of 3 hours.
In a large bowl, combine the apples, lemon juice, sugars, cinnamon, nutmeg and salt and toss to mix. Allow the apples to macerate at room temperature for a minimum of 30 minutes and a maximum of 3 hours.
Transfer the apples and their juices to a colander suspended over a bowl to capture the liquid. The mixture will release at least 1/2 cup of liquid.
In a small saucepan (preferably lined with a nonstick surface), over medium high heat, boil down this liquid, with the butter, to about 1/3 cup (a little more if you started with more than 1/2 cup of liquid), or until syrupy and lightly caramelized. Swirl the liquid but do not stir it. (Alternatively, spray a 4-cup heatproof measuring cup with nonstick vegetable spray, add liquid and butter, and boil it in the microwave, 6 to 7 minutes on high.) Meanwhile, transfer the apples to a bowl and toss them with the cornstarch until all traces of it have disappeared.
Pour the syrup over the apples, tossing gently (Do not be concerned if the liquid hardens on contact with the apples; it will dissolve during baking.)
Roll out the top crust large enough to cut a 12-inch circle.
Transfer the apple mixture to the pie shell. Moisten the border of the bottom crust by brushing it lightly with water and place the top crust over the fruit. Trim the overhang of the top crust so that there is only 1/2-inch of overhand. Tuck the overhand under the bottom crust boarder and press down all around to seal it. Crimp the border using a fork or your fingers and make about 5 evenly spaced 2-inch slashes starting about 1 inch from the center of the pie and radiating toward the edge. Cover the pie loosely with plastic wrap and refrigerate it for 1 hour before baking. This will chill and relax the pastry, preventing shrinking.
Preheat the oven to 425 degrees F at least 20 minutes before baking. Set oven rack at the lowest level and place a baking stone or baking sheet on top of it before preheating. Place a large piece of greased foil on top of the sheet to catch any juices.
Set the pie directly on he foil topped baking stone and bake for 45 to 55 minutes or until the juices bubble through the slashes and the apples feel tender but not mushy when a take tester or small sharp knife is inserted through a slash. After 30 minutes, protect the edges from overbrowning with a foil ring.
Col the pie on a rack at least 4 hours before cutting. Serve warm or at room temperature with vanilla ice cream.


163 Responses
This is the apple pie I make every year at Christmas and it is by far the best pie recipe. It takes time and love, but it’s truly perfect
Thank you, thaaaaaank you for sharing this pie! Omg, it is the best apple pie I have ever had, ever. So good in fact, I shared it on our site today, Flaky Bakers. Can’t thank you enough for this slice of heaven!
can I use the second disk to slice up and make a lattice top? not sure if it will bake the same
Absolutely!
I love this apple pie.
This crust is one of the best crusts I have ever made! It is so flaky, and almost reminds me of filo dough. Rolling the butter out with the flour in the first step definitely makes a difference. Thank you so much, this will be my go-to pie crust from now on!!
would love to print this but too many pages
I’ve been baking homemade apple pie for maybe 5 years now and I call it “I Love You Apple Pie” b/c it’s usually for my family. I love this recipe! I can’t wait to try it out!
This is a delicious looking apple pie and a wonderful tutorial but I don’t have the patience for all of this. Lol!
My grandma used pillsbury crust for her pies and my mom does now. I made this pie yesterday and zomg your crust is amazing!! I can’t wait to make this for my family at thanksgiving!
I’m glad you’re venturing out and making your own Hunter! Happy Thanksgiving!
This pie looks absolutely amazing!! Can’t wait to use this recipe!
Hope you’ll enter my L’Occitane giveaway: https://withlovefromkat.com/fall-beauty-must-haves-with-loccitane-divine-body-oil-cream-collection/
xo Kat
http://www.withlovefromkat.com
Recipe looks simple enough, gonna give it a try
If I were to make a lattice for the top is there anything I should do differently? I really am the most clueless person when it comes to cooking and I stress about everything.
wow I love your recipe and it is so much different from what I usually make :)
https://shrutigoenka.snydle.com/apple-pie-recipe-for-you.html
I love how you rub in the butter using a rolling pin. Beautiful photos!
any recommendations if making for a next-day party?
Hey Lisa,
Did you try this? Which method did you take and how did it turn out?
Thanks!
Hi Joy!
I´ve just started baking american recipies (ok, I just made red velvet and carrot cake) and your apple pie will be my next.
I wanted to do this kind of pies since… always (well, maybe since I started watching “Desperate Housewifes”) but I was scared about pie crust and the one you can buy is… is like if God kills a kitten (am I a little bit exaggerated?… I don´t think so)
Let´s get your and my love and let´s do a great apple pie!!!!
WOW!!! I found this on Google poking around for something else entirely-
and now I’m going to need to go back and read through the old material XD So long my spare time this morning, but this was a really awesome find :D
Hi!
I can’t wait to try this wonderful recipe!
Was wondering what the best way to reheat the pie before eating! Microwave or can I reheat back in the oven…
I love the idea of the kitchen smelling of apple pie during reheating!
Thank you!
i have made this apple pie about 5-6 times in the past two months (and that is a lot considering the effort that goes into it) but seriously! this is by far the BEST apple pie recipe i have ever come across and seriously, the effort n time is worth it.
Thank you for such lovely recipes and such an amazing blog!
lovely post, lovely recipe
Hi, your recipe looks absolutely wonderful :) & I love the fact that the pie crust has no eggs. I was planning to bake this for my parents anniversary tomorrow. I had a few quick questions though. Your recipe says to brush the top crust of the pie with a beaten egg. Can that be omitted ? since my parents are don’t eat egg. Also, what diameter of pie dish should be used & how deep should the pie- dish be ? Thanks a bunch. Cheers !
you can skip the egg if you need to. of course. the top will not be as golden though. the pie dish was a standard 9-inch pie dish.
Hi Joy! Well I’m not much of a baker or a cook for that much so this past thanksgiving I decided to make your With Love, Apple Pie. I tried some of your others recipes so I was thrilled to have found this one. Well long story short I had a problem with this one, I nearly burned my house on fire! I’m confused on the part were after we boil the butter and juice in a sauce pan, we then transfer it to a measuring cup to boil in the microwave for 6-7 MINUTES? I didn’t understand that part but having never to bake a pie I didn’t question it and I did just that. After the first minute or so I turned around and my microwave was covered in black smoke= o I quickly shut it down, my fire alarms went off so did my dogs as thy started to howl like crazy wolfs. I was left with a charcoal like sauce, and a big cloud of black smoke in my house. Help?! What did I do wrong? And why do we need to put it in the microwave after boiling it on the sauce pan? Maybe you meant to say 6-7 SECONDS?
Confused…
It’s 6-7 minutes, but you can also cook in a saucepan on the stove.
Apple pie is one of my favorites, and I haven’t gotten a chance to make it yet this year…I definitely need to make some soon, yum!!
Oh. This pie. First of all…my four-year-old son helped me with every single step of this pie for Thanksgiving…talk about putting a lot of love and laughter into it – what a memory for both of us. We giggled like crazy, were covered with flour, stayed up past bedtime getting the crust just right.
Second of all…it was the most delicious apple pie I have EVER eaten and I’ll look no further for another recipe – this is our new family favorite, and I’ll always remember this first time I made it with my precious big boy.
Thank you, thank you!
this sounds amazing. love the crust!
I am SO making this pie next week for Thanksgiving! It will take longer than the turkey, but it will be worth it. I get such satisfaction when I work hard on something like this and then get to share it with my family. :) Thanks, Joy!
Gorgeous!
Hi Joy, I just wanted to thank you for your tips and encouragement as I attempted to make your recipe for apple pie. For the longest time pie crusts have not been my strong suit. Seems simple enough right? fat, flour, and moisture all at cold temps to ensure flakiness. None less i always grew frustrated that the dough wouldn’t come together as I’d imagined. But after reading your post I decided to try again. Man was I impresssed, rolling out the butter into the flour mix is pure genious. It creates pockets of buttery goodness when baked. So damn good. So thanks a lot Joy!!!
I’ve been testing apple recipes for about a year. Can’t wait to try this one.
2 questions:
1 – What if you don’t have a microwave?
2- When you freeze your dough to store for a couple days, how long does it take to thaw to a temp suitable for rolling out?
Thanks for sharing!
The microwave instructions were just alternate instructions, you can use a saucepan and heat on the stove as well. Let your dough thaw for 30 minutes or so, still cold but soft enough to roll out.
The whole house smells like heaven, so yes, it’s worth every minute! Greetings from Greece!
Joy the baker,
I tried this last weekend! The crust gave me some hassle. Next time i need to drain the apples just a little bit more. Other than that aaamazing! Well at least me and my husband thinks so. Thank you for sharing!
Hello Joy,
I’ve been reading your blog for a few ears but I don’t think I’ve ever left a comment before. I really enjoy it and many of your recipes have become a staple around here. :) I particularly liked this pie crust, the flakiness if awesome and cooking the apple’s juice makes the flavors pop. Thank you for having such an awesome blog. :)
Hello Joy! I just stumbled upon your site and I’m so excited looking around! You write so wonderfully and your pictures are so gorgeous and well composed! I have pinned a bunch of recipes and can’t wait to start trying them (and i might just start with this pie, oh wait, I can have the toasted marshmallow milkshake now so I better go fix that first!) Thanks for sharing!
Thank you for your buttermilk crust! You tough me how to make a good pie!
I am really looking forward to baking this apple pie for Thanksgiving but wanted to do a crumble top instead of a second pie crust on the top. Do you have a good crumb top recipe? I have found a few but am worried that the pie may turn out too sweet with all the sugar in the filling along with the sugar in the topping! Also, do you have the measurements for a single buttermilk pie crust?
Check out my Apple Crisp recipe for the crumble topping. Good idea! Happy baking!
I can’t wait for three days, can I just take it outside the freezer and start working on it straight away?
Not sure if you are aware – but as a fellow Angeleno – I wanted to pass this on…. also, you make darn exquisite food stuffs!
As of today – Jun 1- 2011 – KCRW is Accepting Pie Entries!
Go to:
https://kcrwgoodfood.tix.com/Event.asp?Event=372129%22
Good Food host Evan Kleiman will host the 3rd Annual Good Food Pie Contest. This year’s contest will be held on the lawn at LACMA. Admission to the event is free and open to the public. The entry fee is for pie registration only. Limit one pie per category.
What an amazing pie! Time consuming but worth it. I even went ahead and did a lattice top. Omg, what beauty. It was almost too beautiful to eat….. ALMOST. I had it with a slice of cheddar cheese (don’t knock it til you try it!). Thanks Joy, I’ll be coming back to you for your lively writing, delish recipes and wonderful photography. Much love!
This is the 10th time I’ve made this pie and again I’m amazed by the dough. The best, the most delicious pie dough ever. Period. Thank you thank you thank you.
Hi Joy (:
Your pie looks delicious and I’ve been wanting to try this for two weeks now. Luckily, I was on my winter break so I could give it a try. The pie crust was fairly easy to make but once i got to the apples i had some trouble.
I added the cinnamon, sugar, salt and lemon juice (but i excluded the nutmeg because i didn’t have any :S) to the apples and tossed it. I covered it and left it to sit for half an hour but when I came back, there were no liquid. So i decided to let it sit for a little longer. I came back at an hour, still no liquid, two hours, STILL no liquid. Is there any reason why this is happening? /:
oh um, nevermind ^^” i didn’t see that I forgot the brown sugar. aggh. I feel so silly now @@ i’m waiting for the apples to actually release the liquid now. Sorry!
SO i just got done making two of these wonderful pies. it was time-consuming. oh boy! but am hoping it will be worth it. i have recently lost 75 lbs. in the last seven months. the only thing i really want to go crazy on for Thanksgiving is Apple Pie. so i was stoked to find this recipe. mine certainly doesn’t look perfect but i managed. the pictures were very helpful. i need pictures!!
The pie is ready and now resting. https://twitpic.com/34u7ys
First time I’ve made a pie this labour intensive. :)
By midnight I’m allowed to have a slice :D
OK, did anyone else make the crust with White Whole Wheat All-Purpose Flour?! I just made this pie for guests tomorrow, and this was the only flour in my pantry… I just need someone to tell me it will turn out tasty! (the crust did seem more crumbly than regular white flour… yikes!!)
molly… i bet your pie is going to be awesome!
Ok, the pie filling was DELICIOUS! But, anything whole wheat should probably not be in a pie crust… it was tasty, just not the same :) Thank you though Joy for the encouragement. Next time it is white flour all the way! (will be contributing one of these Apple Pie’s for Thanksgiving, with love…)
Morning Joy:)
Today I am baking my first from scratch apple pie with love. Thank you for this step by step it is exactly what I needed to get me started. The apples are macerating, tee hee, right now. I will let you know how much my family loves it.
ooh man! that’s super exciting! hope it turned out like a dream.
How long does this recipe keep? Can I premake and keep it in the frigde to bake the next morning??
Or is it better to bake it that night and use it the next morning? Help please!! I cannot wait to taste this pie!!
hm. tough question. i think it might be better to bake this at night and keep it until the next morning. this pie should be good for two or three days. definitely three days if you bake it then keep it in the fridge.
Do you know anyone who has tried this and how did it turn out? I was thinking of making each separately and then compiling it the day of and then baking.
Hey Catherine,
Did you try this? Which method did you take and how did it turn out?
Thanks!
I love your blog! Don’t interact much, but wanted to let you know this is my dessert contribution for Independence Day – all american apple pie! Sounds delicious and smells delicious – its cooking now!
I did have some trouble with the crust – mine definitely doesn’t look as smooth as the pictures! But that’s OK it’s usually how it goes with my crusts and it still turns out OK.
Wish me luck!
first off, I LOVE your blog, your recipes are infinitely inspiring!
i make apple pie very similarly to this recipe for my coffee and pastry shop (slight differences in crust recipe and spice combination), and recently discovered a neat trick: if you add the cornstarch to the juice at the moment you boil it down (instead of adding it to the apples themselves and then mix with the juice) it all thickens beautifully and the apples stay together muuuuch more neatly when you later want to serve a slice, and the flavor is just as delicious. mmm!!!
This was the most delicious apple pie every! No soggy crust, the apples stayed firm and were just the right amount of juicy and sweet.
Hi Joy!
Thank you soooooo much!! I’ve tried to make pies before but I could never tell if I was doing it right and usually ended up with a mess. Your step-by-step guide is my savior :D
Never again will I be satisfied with a store bought apple pie :)
I’m making this pie for Thanksgiving today, only I’ve added some cranberries to the mix too. I just put it in the oven and I’m so excited to see how it turns out! I’m glad that I went ahead and made the crust with your recipe, because I think it will be so much better because of that! Thanks for the great recipe!
Oh Joy I’m 41 years young and I have made my first apple pie. From the first bite knowing that it’s actually yummy. I thought I could fly. I’m still in awe of my feelings over this pie. Thank you
Hi Joy,
I love your blog and this recipe. I also love the passion you describe and put in. In my family (I am Mexican) we have a Mexican saying, the secret to good food is to put all your love into the cooking, and your dish will always come out delicious. So I can totally relate to your passion.
These look amazing. My problem with making pies is that I always try to make them healthy. Im still not sure if there is a way to even make a pie taste good and be healthy at the same time!
Hi Joy,
I saved your recipe about 6 or 7 months ago in a word document and pulled it out to make for a 4th of July party. My husband said that this apple pie couldn’t get much better. It was throughly enjoyed by kids and adults. We did a lattice crust on top and it smelled and tasted amazing. A lot of time, but amazing results. I’ve refered to it as a caramel apple pie because of the filling. Thanks!
Just wanted to let you know I cleared a Sunday afternoon and settled myself in the kitchen to tackle this apple pie…..and aren’t I glad I did!
It certainly is a labour of love, with lots of little steps that all add together to create an amazing pie.
The crust, so flaky and sweet. The apple filling, so cinnamony and nutmegy. Together they are a perfect match that will remain happy together forever.
Thanks sooo much for the recipe! I’d never made a pie before and now I’m looking for excuses to make it again and again.
How lovely it was to read this wonderful apply pie recipe, I don’t think I’ve ever seen one so beautifully laid out and easy to follow… maybe now I will actually make an great and edible pie!!
I fail miserably at pies, they simply intimidate me, it all starts with the crust!
Thank you for your lovely blog page, it’s wonderful!!
Elizabeth.
That pie looks great. I did an apple pie for thanksgiving, but I thought the crust turned out too dough-y. I will def give your a try ;)
I like your recipe very similar to mine but here is a little hint. Add your sugar just before you put the apples in the crust as to avoid bleeding.
The same goes with cheese cake as sugar melts causing a wet and sloppy filling.
That looks soooo goood!!!!!!!
Now that is one unbelievably adorable pie!! Great step by step photos!
Thank you so much! I think I will make this for my husband for his birthday which is coming up. He loves apple pie and I’ve never made one for him, this sounds delicious!
Patsyk- Thanks you so much! Food and emotions go hand in hand to me… obviously. :)
HoneyB and Mike and Jennifer- Buttermilk is totally the way to go. You know how some pie crust recipes call for a splash of vinegar? I take the acid from buttermilk instead. I think it’s dreamy.
Jill in Atlanta- I think cooking down the apple juices is the key to having the right amount of liquid and preventing a soggy crust. Did you do that and you still had a soggy crust? Hmmm..
Mandy- I will totally hold your hand and give you all the love I can muster…. if your neighbors are out of love. Give it a shot. Really. Pie works wonders!
My First Kitchen- You’ve never made an apple pie!? Now is the time girl. Give it a shot! I know you can handle it. Do it for the family for Christmas! And you must let me know how it turns out!
Rachel- Thank you so much for such a lovely comment! I just checked out your little bungalow. How darling! I can see you in the kitchen right now, with a 50’s apron on, baking up a pie. Perfect! Perfect! Perfect! Best of luck to you darling. Let me know how the bungalow and the pie turn out! I’m totally rooting for you!
Miri- Thanks so much!
Culinarywannabe- I think you probably have one more pie in you… don’t you think!?
Just when I thought I had had enough pie to last me the rest of the year… Your pictures are amazing!!
Joy, your pie looks just wonderful! And your descriptions of it are so tempting that it makes me wanna try it right now.
Joy, I read your blog every day at work. It truly gives me something to look forward to while I sit in a small little office for 7 hours.
I am in the process of selling my townhouse, and there is a heavenly little bungalow in a heavenly little town near the st. johns river that I am really trying my hardest to buy. This apple pie, literally makes my heart ache (in a good way). I can just picture myself now in my new kitchen and this pie being the first thing I bake in the house. The smell of apple pie being the first scent to flow through the house. It’s not JUST the pie, but the process of making this pie…the love and labor of making this pie in my new house. I’m sure you know what I mean. You are, of course, Joy the baker!
Just look at this place and you will hopefully feel what I am feelin’.
https://www.realtor.com/search/listingdetail.aspx?loc=green+cove+springs%2cFL&mxp=150000&sid=91821dc42dee472f805c9a51f9ce656a&lid=1102358491&lsn=8&srcnt=127
Thanks for the wonderful things you do!
I’ve been so patient for your apple pie, and it was all worth it. I can’t wait to try it. Apple pie is my absolute favorite pie, but I’ve actually never made one myself. I know, right? I’ve always pawned it off on my mom to make for me, but I’m going to be a big girl now and make my own, love included.
Wow. I can’t wait until I’m done with exams and can bake one (or maybe a half dozen) of these!
Will you really hold my hand? Because when someone says homemade and pie in the same sentence, sweat beads on my forehead and I start hyperventilating. I’ve been yearning to make my very own pie and I think I shall choose your recipe for my first. :D Oh but I’m pretty low on love, do you think I’d be able to borrow a cup of love from my neighbors?
The recipe looks great I can’t wait to try it. :)
Gorgeous! The circular cutouts are just darling.
I had two apple pies to make for Thanksgiving, but we live 4 hours away so I made them Wednesday. Was there anything I could have done to have avoided the soggy crusts I had? No one seems to have minded but me (and draining the apples was new to me this year, but a great method!) but I wondered if I could do better next year. For my family, we’ll have your recipe hot from the oven!
I only made my first apple pie last month, but used a premade crust. Thank you for including so many pictures of the crust-making process — I am feeling encouraged to give this a try soon.
Beautiful pie!!! I’ve never used buttermilk in my pie crust, interesting!
Apple pie is one of my favorites and yours sounds delicious. I never tried buttermilk in the crust–I’ll have to give that a shot next go around because I really like the sound of that. Also, the photos, as always, look wonderful!
You are a girl after my own heart. :)
I have not made a piecrust with buttermilk. This I will have to try!
Incredible! I cannot wait to try this.
Thank you for posting it!
Beautiful post! I really do enjoy reading your blog, the way you describe food and the emotions that go with it are simply… perfect.
wow.. such an intro so i m now eargely waiting for the recipe :-)
Cannot wait… ;)
I n so curious to read the rest of your post, I really enjoyed reading the intro to this pie step by step :)
Hurry up! I need your tips. :)
I made an apple pie for Thanksgiving. Pretty good, but I can never get my apples tender enough for my taste.
The irregular holes on top is a nice tough. Looking for forward to the rest of your post and pictures.
I need help with apple pie and trust me, a lot of love goes into it but the crust is giving me fits.
Wow. Such build up. But I have had my posts eaten more than once by WordPress. All of that auto-saving reassuring you that everything is okay. Then you attempt to click Save yourself…and poof. Looking forward to the rest.
Well, I, for one, can not wait for the second half of this post! LOVE-ly looking pie!