We’ve talked about pie crust before, you and I.
I thought today might be a good day for a little refresher. The breeze outside is mighty fine, the sun seems pretty friendly, I’ve got chilled butter in the fridge, and… tomorrow I want to show you how to make a double crusted berry pie… so let’s nail this pie crust first.
Can we do this? Of course we can. I’ll talk you through it and leave hella directions for you to print out. Yes, hella. High five.

Any respectable pie crust has butter. Lots of butter. Lots of cold cold cold butter.
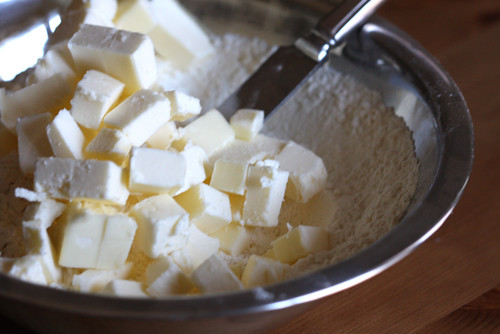
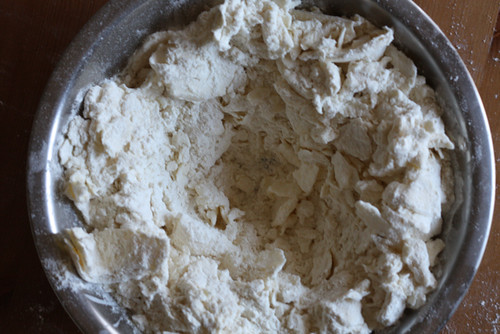
I’ve cut up our two sticks of cold butter into cold cubes and tossed them with the dry ingredients.
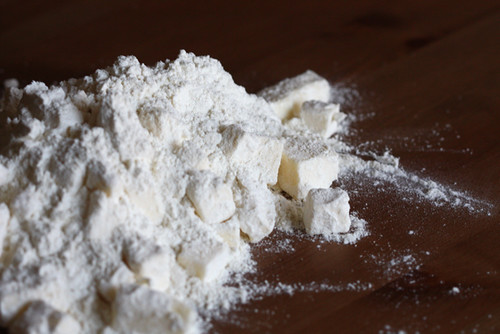
Next… dump the whole dang thing on the tabletop. The whole dang thing. Don’t be scared. We’re in this together.
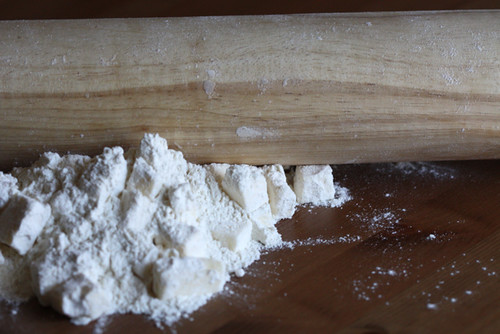
Bust out that rolling pin. I use the rolling pin to flatten out the cold butter cubes and incorporate them into the dry ingredients. Some people use their fingers. Some people use a pastry cutter. Other people use a food processor. Sure… but that’s not what we’re talking about here.

Roll the loose dry ingredients and the cold butter, using your hands or a bench knife to pile up the mixture and roll it out again. The goal here is to make flattened sheets of cold butter within the flour mixture.
Like this! I’ve put it all back in the bowl. I used my hands to do this. I also made a little well in the center of the butter and flour mixture. That’s where I’m going to pour in the cold buttermilk. Mmmm.

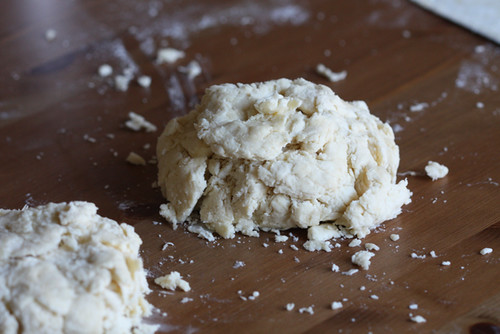
Believe it or not this is the dough after I’ve added the cold buttermilk. But it’s so shaggy!? Yes… yes it is. It’ll all come together. It just needs a good pressing together and an hour long rest in the refrigerator.
I’ve divided the dough into two rough balls.
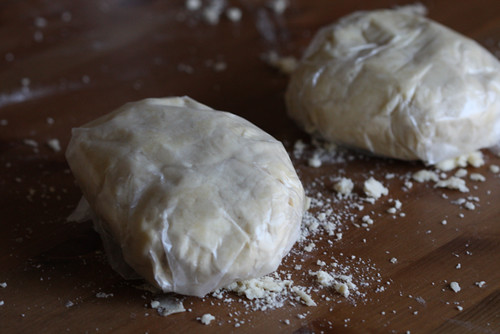
Wrap the balls in waxed paper and place in the fridge for at least an hour. Resting the dough like this is super important. It helps the butter re-chill which is important when it comes to rolling out and baking the dough aaand the rest helps the liquid incorporate properly into the dough.
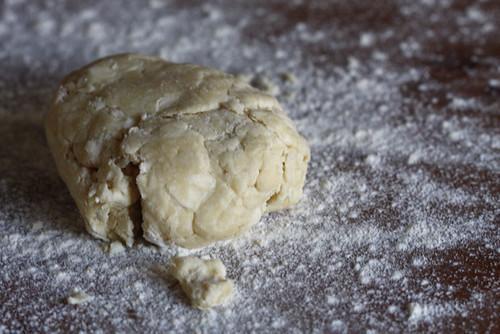
Chilled dough disk on a well floured surface just before the rolling out process. I’ll sprinkle flour on top too before I attack this thing with the rolling pin.
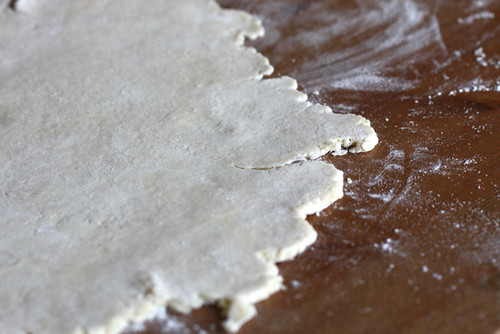
Rolled out.
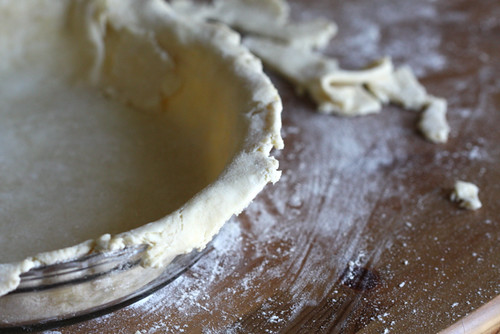
Panned up and trimmed.
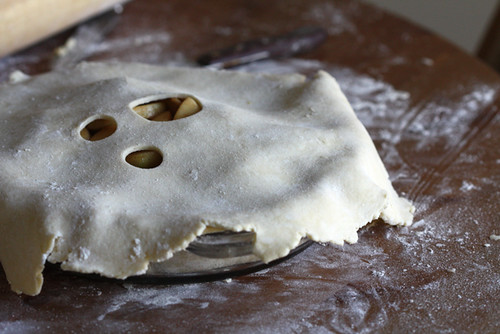
This particular pie crust was for an Apple Pie.
Once the top crust is rolled out and placed over the filling, trim the excess dough so that there’s about 1/2 to 1-inch of extra crust.
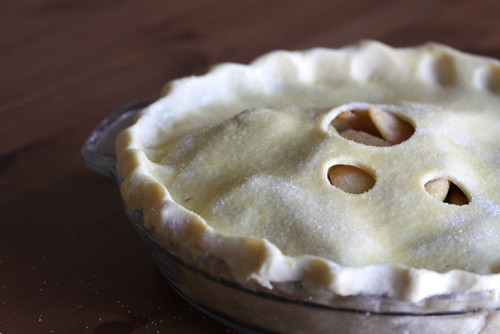
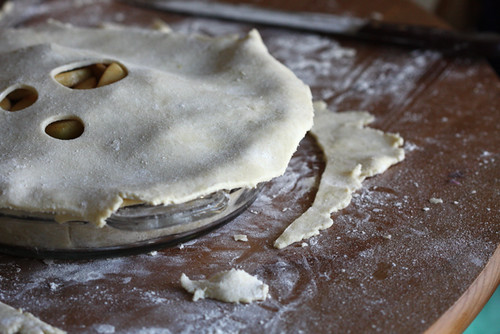
Pinch the extra dough together with your fingers or with the tines of a fork. Make a pretty pattern.
Not so bad… right? Tomorrow we throw berries in the mix. Prepare.
Buttermilk Pie Crust
makes a double crusted 9-inch pie crust
2 sticks (8 ounces) cold unsalted butter
2 1/2 (12 ounces) cups all purpose flour
1 Tablespoon sugar
1 teaspoon salt
1/2 cup (5 to 6 ounces) buttermilk
1. Cut the butter into 1-inch pieces and place in the freezer to chill for 15 minutes. Measure out the buttermilk and store in the refrigerator to keep it cold (you could even put it in the freezer for a few minutes too).
2. Sift together the flour, sugar and salt in a large bowl. Take the cold butter from the freezer and toss it with the flour mixture.
3. Dump the cold butter cubes and flour mixture onto a large work area for rolling. With a rolling pin, roll the mixture, flattening the butter cubes with the flour into long, thin, floured butter sheets. Work quickly to ensure that the butter stays cold. Below is what the rolled butter and flour look like after I’
ve gathered them together on the work surface a bit.
4. Place the flour and flattened butter back in the large bowl and chill for 10 minutes. When the butter is cold, remove the bowl from the refrigerator, make a small well in the center of the flour and butter mixture. Add the cold buttermilk to the bowl all at once. Begin to bring the dough together with one hand ( keep the other hand free to answer the phone). Moisten all of the flour with the milk, using your hand to break up large clumps of milk and flour. The dough will be rather shaggy, but you can add another tablespoon of buttermilk, if you see that all your flour isn’t moistened. Form the dough into two disks. The disks will be rough, and hard to shape together, but once they rest in the fridge for an hour, they’
ll be easier to roll out.
5. Chill the dough for at least an hour in the refrigerator. At this point, the dough will keep in the fridge for up to three days, or in the freezer for up to three weeks. For freezing, roll the dough out into sheets and wrap them in plastic film.
6. Roll out the top crust large enough to cut a 12-inch circle.
Transfer the pie filling mixture to the pie shell. Moisten the border of the bottom crust by brushing it lightly with water and place the top crust over the filling. Trim the overhang of the top crust so that there is only 1/2-inch of overhand. Tuck the overhand under the bottom crust boarder and press down all around to seal it. Crimp the border using a fork or your fingers and make about 5 evenly spaced 2-inch slashes starting about 1 inch from the center of the pie and radiating toward the edge. Cover the pie loosely with plastic wrap and refrigerate it for 1 hour before baking. This will chill and relax the pastry, preventing shrinking.


162 Responses
Oh my I have to try this. My daughter was just asking me today to make pie crusts for Thanksgiving, but I too have been stressing about the task as pie crust and I have a love hate relationship. I don’t care how many I make they never turn out the same. Thanks for destressing me. :-)
One can only hope that more pages were written so clearly and with humor — to say well done is not enough. Thank you.
Joy, I really like the texture of this pie crust! It is crisp, flaky, tasty– and well, AMAZING. My one need for improvement.. mine turned out a little tough. You couldn”t cut it with the plastic forks at my last BBQ. I don’t think I overmixed the four… If anything I undermixed it. Any suggestions? Do I need to add a little more buttermilk next time?
Joy: I just discovered your wonderful site. Thanks for all the inspiration!
I made this crust two weeks ago to make blackberry/raspberry hand pies, and it came out quite good. Now I’m getting ready to make a couple of batches of the same pies to keep in the freezer for unexpected guests.
Here’s my thought: I’m going to try to use my pasta machine to roll out the dough. Since it doesn’t have to be as wide as a standard pie crust, the machine will make the perfect width. And the thickness will be perfectly uniform. Of course I’ll stick the machine in the freezer prior to using.
Thoughts?
I have made this and it’s wonderful. Great pie crust!
https://oliepants.wordpress.com/2012/07/04/fresh-berry-cream-pie/
Would this crust be good for savoury fillings too?
yes it would!
it’s awesome if you have the picture of finished product. i’ll try to make this one with my mother, it’s a good way of bonding with her’. thanks!
my pie is chillin in the fridge right now and i couldn’t help but try some of the dough… oh my god, it is freaking delicious! goodbye shortening!
OMG thats the coolest crust I have ever worked with. It was so easy to work. We have a strawberry pie in the oven right now and my two daughter are jumping up and down in the kitchen waiting for it to get done. And to be honest I feel like jumping up and down in the kitchen too (but the neighbours might be watching LOL).
I’ll post again after our taste test….thank you!
M
I’m going to admit. I did not follow the directions to this at all! Haha. I used shortening instead of butter… only because I bought a ton of it and need to use it, and I used vinegar and milk instead of buttermilk. It’s in the oven right now and the crust was soooooo easy to handle! I’ve been using my mom’s recipe for a long time and it’s just so hard to handle. If this is any much as flaky as her recipe I’ll be sticking to this one… forever changing our family secret apple pie!!!! OH NO! It’ like kitchen telephone.
Joy ,
when i made crust and crimped edges it looked great however in oven the edges completely “melted ” and you couldnt tell i had crimped or done anything to edge, what happened do you think? also, in case you dont get other message, my 10″ deep dish took like 2 hr 45 min to cook to get bubbly in center (using lattice top) so crust ,although covered, came out dark brown and rather crispy . what should timing be adjusted to for larger pies and does “center” really have to bubble? what can you suggest? I like larger deep dish pies and crust are my favorite part, what can i do so it turns out next time?
Get some ads Joy! I was going to click, make you some … dough :0) Thanks for the great pics. Now, what to do when the dough out of the fridge is too hard to roll? Wait? Pound it like crazy? (6 month old JUST fell asleep, don’t really want to do that…)
Oh Joy! I just made this pie crust (actually, I made your whole blueberry pie) and lordy! I’m no longer intimidated by pie crust.I did take an insurance policy and do all my rolling out on a sheet pan that I’d stuck in the freezer for a few minutes… but still, goodness, the crust is awesome!
If we freeze the crust for a few weeks, how do we work with it when we’re ready to use it?
Buttermilk is simple to make homemade!!! Simply blend Heavy Cream ( Whipping Cream) until it turns a pale yellow (about 10 minutes) !!! You will have a combination of homemade butter and buttermilk, which is the liquid that develops when making butter!!
me again, meant SOGGY, but it’s usually sorry when it’s done
So I am going to try this this morning. I usually make pate brisee in a food procedssor, but it shrinks no matter what I do. I have followed Rose Birnbaum’s instrrcutions, American’s T^est Kitchens, Dorie’s, and countless others, and it all shrinks. I usually prebake a bit so the bottom isn’t sorry, but that’s when it shrinks the worst. So I am going to crush graham crackers in the food processor, and give this a try with my old rolling pin.
Wish me luck
I make this one often, and one just like it except it uses cold water instead of buttermilk. Sometimes ya just gotta eat pie!
Thank you Joy! This was my first time making a pie dough and I went in ‘no-fear’ like you said, and it went great!
I just made my first piecrust ever using this recipe. You said “do it,” so I did. Then you said “trust me,” so I did. And you know what? It worked. It was so pretty and golden brown. Oh buddy, it was delicious. And it was fun! Thanks Joy!
to tell the truth,i do think i can finish it,maybe it’s a difficult for me.
I double the recipe and made 2 pies last night. I am up to my ears in cherries right now so I froze both of the pies. Any idea how this crust does for frozen pies?
Okay, I have to admit, I pretty much didn’t believe you. But, I thought, what the hell. So, dumping that stuff on the counter? Still not believing. Rolling it out? Nope, not a believer. It came together fine with the buttermilk but little Miss Skeptical was still hanging around.
The next day…hmmm, rolling out was pretty easy. Hmmm, this crimped better than expected. It looked great out of the oven but I was nervous serving the pie to company especially since it included our friend the Pie Queen. Tasting? OMG, this crust rocks, I thought as I shoved more into my mouth.
My husband said today that he thinks the crust is even better the 2nd day. He might be right.
Okay, I’m a believer. ;-) Thank you!!!!
(I used raspberries, blueberries and black raspberries for the filling–all the smashed berries in our fridge that told me they needed to be pie. Delish.)
I had the same skeptical reaction as I was reading Joy’s prescribed technique. I used the COVID quarantine to finally learn how to make a good pie crust. I baked eight pies in six days using a variety of recipes and techniques. I finally landed on my favorite. However, this recipe intrigued and inspired me to make a peach crumb pie. I halved the recipe and used this technique with great success. I found it extremely satisfying to use a rolling pin to smear the butter into the dry ingredients. I’ll definitely use this recipe for future pie crusts. Thank you, Joy! Now on to tackling the technique for making good macarons!
Using a rolling pin to make pie crust.. There’s something I never thought of!!
Thanks for the recipe! I avoid making pies cuz I thought you needed a food processer in order to make a perfect pie crust and I don’t own one(yet). I will definitely try this one.
I am totally making this crust right now – it order to make that awesome looking blueberry-blackberry pie later. =D
Thanks!!
Okie dokie……I filled mine with fresh-cut Georgia peaches and just popped my pie in the oven 4 minutes ago. Let’s see how it turns out!
Kinda excited!!! :)
Ohhh Joy! I ABSOLUTELY LOVE YOUR SITE! And pies. A LOT.
I’m from Argentina and I don’t know what buttermilk is or how to get it here. You see, we don’t have that kind or quality of pastries in my country, we usually choose the good old fashioned “facturas” —> https://es.wikipedia.org/wiki/Facturas
Sorry, they don’t have it translated in English, but if you look for “medialunas”, or “cañoncitos de dulce de leche” in Google Images maybe you can understand what we usually eat.
Ok, again, PLEAAAAASE I would love to make this pie crust, but still don’t know what buttermilk is and if it’s not pretty difficult to home-make it ’cause I’m pretty sure we don’t have it here.
Love your site!
Hey Micaela!!
You know what i suppose you can try is a powdered buttermilk product, which you mix with water & waaalaaaa… you have buttermilk!!! I recently bought this product at the grocery store because I was sick and tired of buying a whole carton & not being able to use the whole thing before the “best if used by” date. What a waste! I’ll tell you, I have yet to try it though. I’m guessing it might not be as good as the liquid kind, but i’m willing to try it. Anyway, it’s called Saco Cultured Buttermilk Blend and you can order it off Amazon.com. Happy Baking!!!
Thank you SO much, Nicole!!! I’m gonna give it a try!
Another easy substitute is adding a little vinegar or lemon juice to whole milk. For example, if you need one cup of buttermilk, fill a measuring cup just shy of one cup and add vinegar to make one full cup. Let it sit about ten minutes, and you will have buttermilk!
I love your addition of buttermilk – I would have never thought to use it, but I imagine it makes this crust all the more delicious. Lovely, Joy!
Perfect timing. I am in charge of pies for our Fourth of July picnic!
Last night, I made your no-roll pie crust (which I love, love, love) – used 1 batch to make a tomato pie for dinner and a mini peach pie for dessert (with crumb topping instead of a top crust). All delicious! Thanks.
Joy! Feeling it… but scared to do it! Wow… I am a nerd. I love to eat pie.. but have had some bad dates with Mr. Crust.
Thank you for sharing.
Love the rolling pin trick. Totally using that one.
Joy, you make this look so foolproof. When I made a crust once, I had pools of melted butter at the bottom of my oven! I know it wasn’t temp of the butter, it was cold when it went in. I checked with KA Flour and they thought it might have been that my butter pieces were too big. If you use a rolling pin here, how do you avoid the “big butter chunks” issue? Thanks!
I’ve never seen a pie crust with buttermilk. Will definitely give it a go! I’m thinking Strawberry Rhubarb.
Love this post!! You’re hilarious! Lovely pie, too — I’ll look forward to the berries…
Good recipie!
Its never been the making of the pie crust I can’t do, its the rolling. Rolling without getting it to stick to the pin or the counter (yes even with TONS of flour), rolling it into a almost perfect circle, and rolling it fast enough so it stays cold.
looks good Joy! i gotta have some shortening in my dough though :)
Definitely going to try this…
I do wonder…do you do anything special with your pie dough scraps?
I appreciate the step-by-step tutorial, especially since I always think my dough is too shaggy. Now I know it’s fine!
I prefer my grandmas pie crust which is simply oil, milk, flour and salt. Its so fool proof, never shrinks, and really takes no skill at all! Not to mention its flakey, crispy and salty. But there are some recipes that I think require the classic pie crust using butter. Bookmarking this!
I’ve never ever seen a pie crust recipe using buttemilk. Since every pie crust I’ve made comes out like a brick, I will definitely try this. You’re such a clever girl!
This pie crust recipe ROCKS out LOUD!!! I love how you use the rolling pin to get those pieces of butter flat AND I love the fact that this recipe uses BUTTERMILK to bind everything together! Can’t wait to see tomorrow’s recipe for the filling of this pie crust magic. :-)
It seems so easy…
I think I’m going to try, and I’ll tell you how it went!
Love,
Lia.
Oh my goodness!!! I may have to try this soon. My husband is REALLY dying for a lemon meringue pie, since he just got me a large pastry board (I have very little counter space). My mom’s crust recipe always used chilled water and vegetable oil…Her crust is delicious, but you posting this has made me want to take on a new crust challenge. Thank you for your wonderful ideas!
I love to make pie. My grandmother was an amazing pie creator and she shared her skills and wisdom with me. The issue, she uses the old school methods (shortening or lard) and while they make a nice flakey crust there is just something fascinating about using butter…and now buttermilk! Awesome! I am going to have to part from tradition and give this pie crust a whirl.
A perfectly timed Summer post, especially with last night’s “Top Chef” pie disaster episode . . .
awe, man – “hella” is such a cali gem. love it. can’t wait for the berries manana…
I use very similar methods although I use vodka as my secret ingredient – the ethanol chemical bonds in the alcohol (which is all burned off by cooking, of course) make it perfectly flaky every time!
Hmmm….I’ve never had good luck with pie crusts. I find it very intersting that you’ve used buttermilk instead of the usual ice water. I may also have a rolling problem. Aren’t you supposed to only roll from the center out? That has always confused me a little bit.
Joy, you must’ve been reading my mind. I made two pies this weekend (beef pot pie and rhubarb) and the crust was…meh–pre-cook melty and post cook crumbly and dry–I blame it on the heat and lack of counter space. At last, though, you posted a crust that just might work. Thanks!!
Yummy! And so fitting, as the Top Chefs had to make pie last night and none looked as good as this!
I have fond memories of my mother taking the pie crust scraps, sprinkling them with cinnamon sugar and baking them for me. It was such a yummy treat. Sometimes she would put a little dab of jam on them and when they came out of the over, a dusting of powdered sugar. Ahhh, childhood memories.
O.M.G
How much do I looooove those 3 circles cut into the top of your pie! Serious mod-factor!
Joy, I love your blog posts. Slightly humorous and always so casual.I make pie crust all the time, I can’t bring myself to buy store-bought.
I suffer from pie crust anxiety, too. Thank you for a really interesting recipe (buttermilk is a new ingredient for me) and especially for the wonderful photos to help me gauge what I’m working with. I’ll try it!
I have to say, that I’ve used my auntie’s “no fail” pie crust recipe for a long time and it’s always worked out great! But Joy….this recipe…..looks absolutely scrumptious! I will definitely try this!!! YUM!!!
Joy, you know things. I would trust your pie crust with my live savings of berries any summer.
Sometimes my pie crusts turn out; sometimes they’re a soggy, yet chewy wreck. As in it will be a long time before I try another pie because I just ruined several cups of the cherries my dad picked and pitted and hauled to Minnesota for me even though my mom wanted to horde them in the freezer for cherry pie at Christmas.
But your process makes more sense to me than Betty Crocker’s, and I’m eager to try it out!
This looks like a wonderful method! Buttermilk, eh? Sounds scrumptious.
i heart berry pie! i’ve never made a pie crust wth buttermilk in it before–yum!
Joy~~ I LOVE pie crust! In our family it is usually PIE for birthdays.. either Dutch apple.. or French Silk Pie.. and it is always FUN to have left over pie crust to roll our and turn into itty bitty cinnamon rolls.. that we call..pie crust cookies!! I plan to make your pie crust recipe SOON.. oh yum! Coffee is on.. come on over!
you used the frissage technique! but with a rolling pin! genius.
yea… totally.. um… i knew that.
I have the recipe printed and I am gonna try I have always been a failure when it comes to pie crust….thanks for sharing this great tutorial..
This pie crust looks perfect. I want a slice of pie now!
You make it sound so easy!
Btw, do you chill your flour in the freezer ahead of time? I read the other day that one blogger did this. (smitten I think?).
Gonna try this…scared…but gonna try….sometime…soon.
TY!
Jen-
no… i didn’t chill my flour. i really don’t think you need to.
hi joy, is the texture of this pie crust similar to your no-roll one? i can’t imagine making pie crust in summer! i’m always afraid of the butter melting too quickly.
i have tried pie crust a few times and it never seems to work for me… i will have to follow your “hella” directions next time :)
I’ve never made homemade pie crust. It just always seemed like so much work. I can’t wait to try this recipe. I’m inspired.
Inspired by last night’s Top Chef quick fire? :)
nope.. just a coincidence! i haven’t seen top chef yet.
Oh, I’m so excited, but I’m so nervous! Blueberry pie here I come!
If you make a gelatin syrup like a strawberry pie, as soon as you are through heating it, throw in frozen blueberries instead of strawberryies, it is absolutely heavenly!
I still can’t get my pie crust as perfect as my grandmothers. I’m convinced it was the lard she used.
Wow. This is different. Now, I already make pie crust and I don’t see why people get so afraid of it, but now I think I want to try your method because the whole buttermilk thing intrigues me. I love buttermilk. You’re too cool.
how did you know joy?! how did you know that just 2 days ago i was asking my mother and sisters and neighbors and strangers at the laundromat how to make a pie crust?!?! we have an unspoken connection, you and i… ;) thanks a million for the rundown. ;)
You know why I avoid making pies like the plague. Pie Crust.Will give this a try. :) Thank you.. You come up with the best stuff btw.. & I could live on butter if I had to.
I just made pie crust this morning. You are a mind-reader, aren’t you? But my recipe uses water. Maybe buttermilk IS the key to fluffy flaky crust. And I used your tip on grating the cold butter. Can?
I always make all my short crust pastry in the magi-mix. But looking at how you have done it. Your pastry must be delicious and light because it hasn’t really been over-worked and there are some nice big pockets of butter. I love that you make everything sound so accessible and just – you know…EASY! Thank you.
Wow! Thank you for posting this up. I’ve never really baked a real pie before and I’m actually thinking of baking it in these coming days. Thank you for your guidance and tips! :) I appreciate it a lot.
Your pie crust sounds amazing. Butter, butter, butter. Yummy :D
Wei-Wei
This is great indeed, now, at long last, I understand a little bit more about pie crust, besides I love to use my rolling pin!
Oh god, you have to be killing me…
Why do you always come up with such great stuff? And so easy for us to remake as well?
It’s my hon’s birthday this weekend and I already baked like 5 things yesterday and have 3 more on the list for today. You cannot just come up with a perfect pie recipe.
Well. I might just have to add one more thing to the baking list and pie would just be too perfect for the weather right now…
Stop being so great, please!
love the idea of adding buttermilk instead of water to make the crust!
Thank you so much for posting it. Because pie crust is not really a friend of mine. Maybe its time to start it over.
You gave me hope! Thanks a lot.
I am loving the no-breadcrumb-making appeal of this! Have been debating playing with a new crust recipe recently (as in my laziness I’ve been using *gasp* Jusrol ready pastry – oh the shame!) This looks wonderful and I bet the flat butter makes awesome buttery pockets, mmm.. apples here I come!