Description
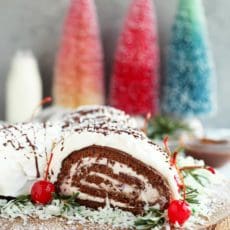
A classic holiday cake to make the Yuletide bright – with chocolate and cherries.
Ingredients
Scale
For the Cake:
- 6 large eggs, separated
- 1/4 teaspoon cream of tartar
- 1/4 teaspoon kosher salt
- 3/4 cup (140 grams) granulated sugar, divided
- 3/4 cup (95 grams) all-purpose flour
- 1/4 cup (25 grams) unsweetened cocoa powder
- 1/2 teaspoon baking powder
- 1 teaspoon pure vanilla extract
- 4 tablespoons unsalted butter, melted
- 1/4 cup strong brewed coffee, at room temperature
- 1/4 cup powdered sugar + 2 tablespoons cocoa powder for dusting
For the Filling and Frosting:
- 2 teaspoons unflavored gelatin
- 2 tablespoons water
- 2 cups heavy cream, chilled
- 1/3 cup (35 grams) powdered sugar
- pinch of kosher salt
- 1 teaspoon pure vanilla extract
- 1/2 cup frozen cherries, thawed, drained and thawed
Optional toppings and decorations:
- 1/2 cup chocolate chips melted with 1 1/2 tablespoons coconut oil
- maraschino cherries
- fresh rosemary or fresh thyme
- shredded coconut tinted with green food coloring
Instructions
- For the cake: Preheat the oven to 350 degrees F. Spray a 13-by-18-inch (a half sheet pan) rimmed baking sheet with nonstick cooking spray. Line with parchment paper and spray the parchment. Set aside.
- In the bowl of an electric stand mixer with a whisk attachment, or in a medium bowl with electric hand beaters, beat the egg whites, cream of tartar and salt until frothy. Add 1/4 cup granulated sugar and beat on high speed until stiff, glossy peaks form, about 2 minutes.
- In a separate medium bowl, sift together the flour, cocoa powder and baking powder. In a separate medium bowl, combine the egg yolks, the remaining 1/2 cup sugar and the vanilla. Beat with a whisk until thick and creamy, 3 to 4 minutes. Beat in the melted butter and coffee until combined.
- Add the flour mixture to the yolk mixture and whisk until well combined. Fold 1/3 of the beaten egg whites into the batter until no streaks remain. Gently fold in the remaining egg whites in thirds until combined.
- Transfer the batter to the prepared pan, gently spreading the batter so it fills the corners of the pan with an offset spatula. Give the pan a little shimmy to try and make the batter as even as possible across the pan. Bake until the top just starts to spring back when gently pressed, 10 to 12 minutes (the top might still feel a little tacky but that’s normal). Try not over bake the cake or it will crack. Allow the cake to rest for 5 minutes. Use the offset spatula to gently loosen the edges of the cake from the pan.
- In a small bowl stir together the powdered sugar and cocoa powder. Transfer to a sifter. Place a clean dish towel on a large wire rack. Dust the towel with half of the powdered sugar mixture. Turn the powdered towel over onto the top of the cake and gently place the rack on top of the towel that’s on top of the cake. Gently invert and carefully remove the parchment. Dust the top with the remaining powdered sugar mixture.
- Starting at one of the short side sides, use the towel to tightly roll up the cake with the towel inside. Position the cake seam-side down and let cool completely.
- To make the whipped cream, in a small bowl combine gelatin and cold water. Let stand until thick and set.
- Microwave gelatin mixture until it dissolves into a liquid. It should only take a few seconds. Allow to cool slightly but not set. It if sets, we’ll microwave it again.
- Place the cream, powdered sugar, and salt in the bowl of a stand mixer or in a medium with electric hand beaters and whip the cream until it just begins to thicken. Slowly beat in the liquid gelatin and vanilla. Increase the mixer and whip the cream until stiff.
- Place just over half of the whipped cream in a bowl and stir in the chopped cherries.
- To assemble the cake, carefully unroll the cooled cake and spread evenly with the cherry whipped cream, leaving a 1/4-inch border on all sides. The filling should be about 1/2-inch thick. Re-roll the cake, using the towel to help you.
- Slice 4-6 inches off one end of the cake on a diagonal and set it next to the cake like a split log. Use the offset spatula to coat the outside of the log with the remaining whipped cream, making line with the tines of a fork to create the look of bark. Chill while you assemble the decorations.
- To decorate melt chocolate and coconut oil. The mixture should be thin enough to splatter across the cake. Use a spoon and flick your wrist to splatter chocolate over the cake.
- Decorate the cake with cherries, fresh herbs, or candies.
- Store in the refrigerator until ready to serve and up to 3 or 4 days.
Notes
You’ll notice gelatin in our whipped cream filling and topping. Adding gelatin to whipped cream helps stabilize it, making it more sturdy as a filling and topping. It give the cake a longer life in the refrigerator, too. If you’re opposed to using the gelatin, no problem – you can leave it out, just serve this cake within a day of assembling.
