Grab your pen and get ready to cross something off your Baking Bucket List (you have one of those, right?). Today we’re making the most festive of holiday cakes and it’s shaped like a log. Yes, we’re asking our chocolate cake to roll and contort and look like a log of wood for our holiday pleasure – it’s a Christmas yule log cake recipe!
If you’re curious about the history of a yule log cake I’ll give you the most Cliff Notes of versions. Yule log cakes or a bûche de Noël cake starts with actual logs, big pieces of wood that were ceremoniously burned in ancient Europe times as a Celtic and Gaelic symbol of the end of long dreary winter days. Time went on, as it does, and giant yule logs became smaller yule logs that were burned in smaller hearths on Christmas Eve. You know what smaller hearths are good for? You guessed it: baking cakes.
Enter marzipan. Enter meringues. Enter sponge cake. Find yourself in France and you’ve got yourself a fluffy, cream filled cake shaped like a piece of wood.
And now here we are, thanks to the many generations of people who burned logs, lived through very cold winters, and wanted cake. Now we’re to muster our very own kitchen courage to roll a warm cake in a towel, fill it with cream to usher in the Yuletide.
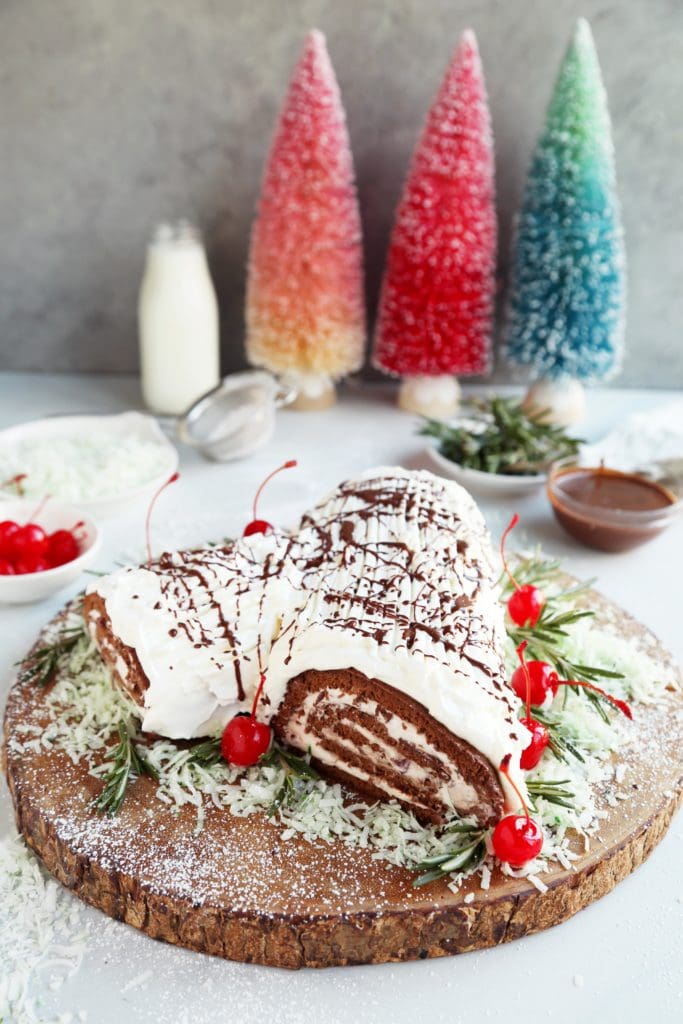
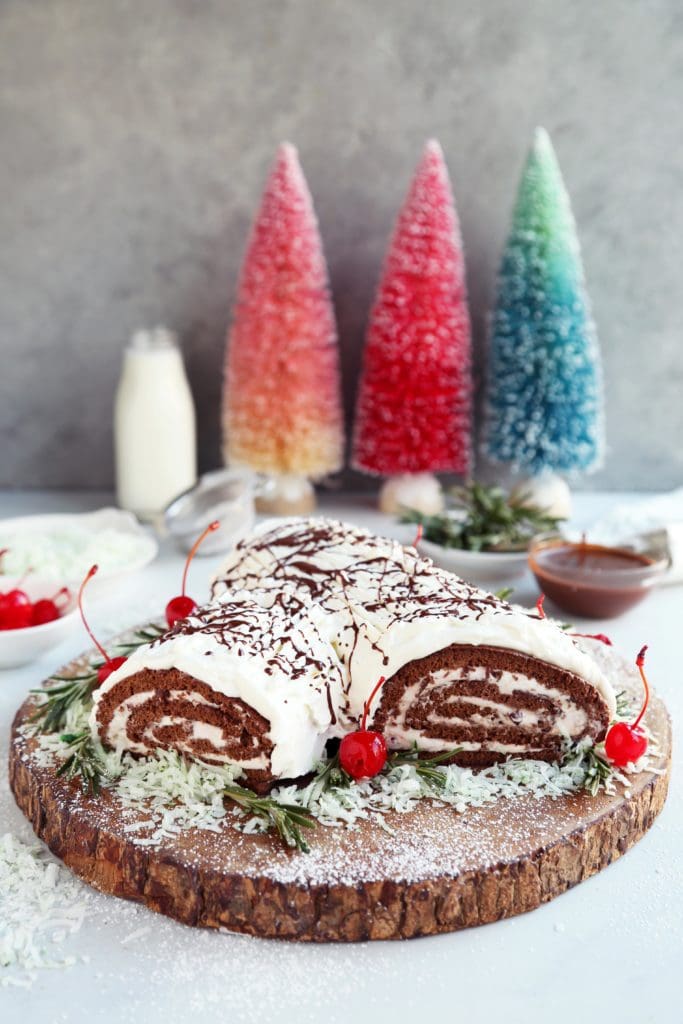
Let’s talk about the nuts and bolts – the cake and filling. I made a chocolate sponge cake and filled it with cherry-studded whipped cream. It’s a play on my favorite Ben and Jerry’s ice cream flavor, Cherry Garcia. It’s topped with whipped cream, splattered in melted chocolate and surrounded by cherries and greens.
Ambitious and delicious. I sincerely hope this is your weekend baking project!
Happy Holidays, friends!

Here’s what you’ll for your Yule Log cake baking adventure:
• 6 eggs, separating the yolks and the whites
• cream of tartar and salt we’ll beat into the egg whites to set.
• granulated sugar to whisk into the egg yolk, creating thick ribbons of yolk.
• cocoa powder, flour, and baking powder are our dry ingredients.
• melted butter and strong coffee to add moisture, fat, and flavor to our cake batter.
• unflavored powdered gelatin is used to create a more stable whipped cream for filling and frosting.
• heavy cream, powdered sugar, and vanilla.
• frozen cherries, if you’d like, for the filling.
• to decorate, maraschino cherries, rosemary sprigs, melted chocolate, shredded coconut and anything else you might find festive.
What follows is are step-by-step photos of how this cake comes together for your baking reference. Feel free to scroll aaaallll the way down to the recipe if that’s all you need today.
We’ll start by working with the eggs, specifically the egg whites.
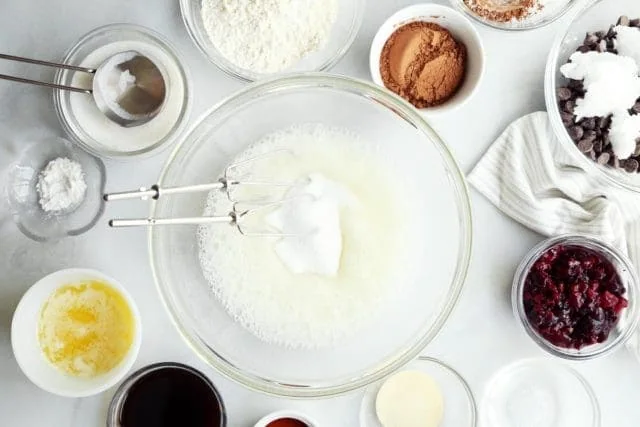
Beat the eggs whites with cream of tartar and salt until frothy. Add the granulated sugar and continue to beat the eggs until they increase in volume and hold stiff peaks. This usually takes 5 to 7 minutes. Don’t be discouraged.

See all the fluff and volume? This is what’s going to make our chocolate cake light, spongey, and most importantly – tender enough to roll.
Next up, we’ll attend to the egg yolks.
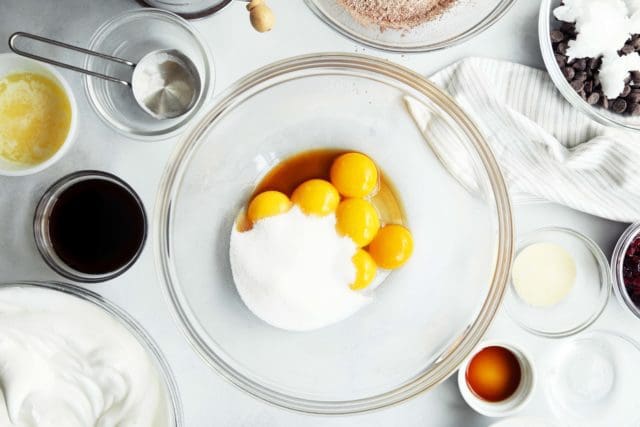
Cream the egg yolks with the remaining sugar and a splash of vanilla extract. We want to begin to aerate the egg yolks as well.

After 3 to 5 minutes the yolks are pale in color and thick enough to temporarily hold the lines of the beaters. That’s volume we’ll take all the way to the oven. Eggs are magic.
Beat in the melted butter and coffee.
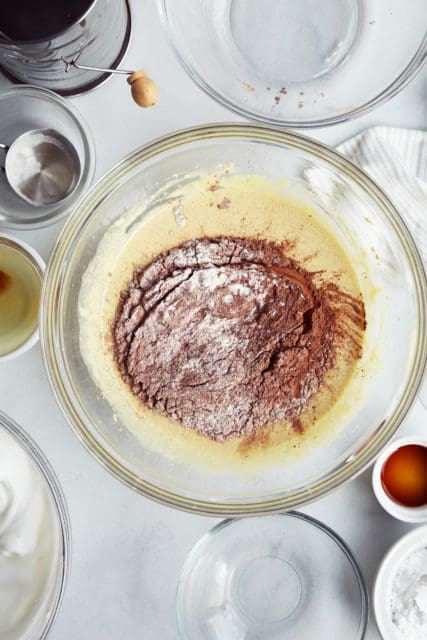
Next, we’ll stir the dry ingredients (our flour, cocoa, and baking powder) into the egg yolk mixture. We’ll have a thick, brownie-like batter on our hands.

We’ll aerate our rich chocolate batter with the hard working egg whites. Gently fold the egg whites into the chocolate batter in thirds. Combine thoroughly, so no white streaks remain. Be conscious of over stirring and deflating the batter. It’s a delicate balance. I lean towards a few egg white streaks in the batter as opposed to over mixing.
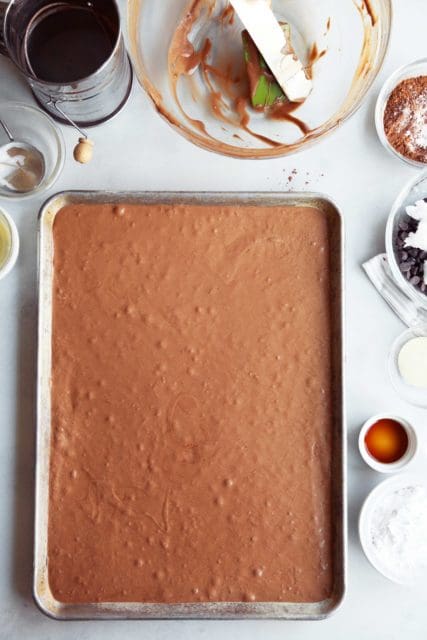
Grease a 1/2 sheet pan that measures 13×18-inches with nonstick baking spray. Line with parchment and spray the paper too.
Size matters. We want the cake to bake evenly and thin enough to roll so the half sheet pan is key here.
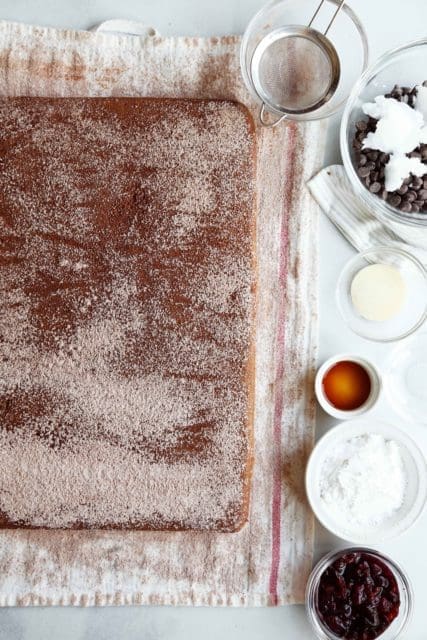
The cake will bake for a short 10 to 12 minutes. The top may still a bit tacky, but the cake should be cooked through when you take it out of the oven. Remove from the oven and allow to cool for 5 minutes before inverting onto a cocoa and sugar dusted clean kitchen towel. Peel back the parchment and thoroughly dust the top of the cake with cocoa sugar, too.

With our warm cake directly on the kitchen towel, start from the short end and begin to gently roll the cake and towel into a spiral.
We’re teaching the cake what shape we want it to be. A bit of warm training.
Let the cake cool to room temperature.
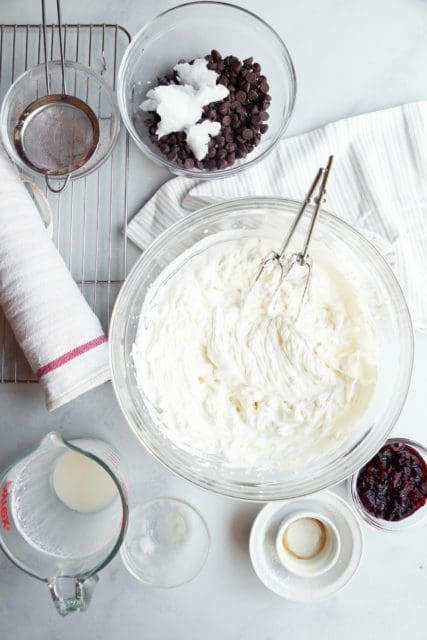

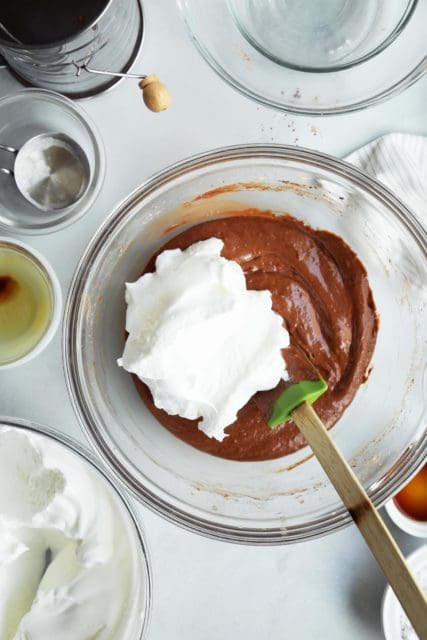
While the cake cools, we’ll make our whipped cream and filling.
For this cake, I like to make a stabilized whipped cream – cream that has gelatin beaten into it. It’s a more sturdy whipped cream, and holds its own rolled inside a cake. We don’t want the mush factor and gelatin is our fail safe.
If you’re opposed or don’t have it on hand and plan to eat your cake rather quickly, you can skip the gelatin game.
Beat cream, sugar, vanilla and salt. Beat in the gelatin to still and swoopy peeks. Divide the cream in half or so, and stir chopped cherries into one bowl of cream. If there’s a bowl that has more cream, use that as your cherry filling.
I used frozen cherries, thawed / drained/ and chopped.
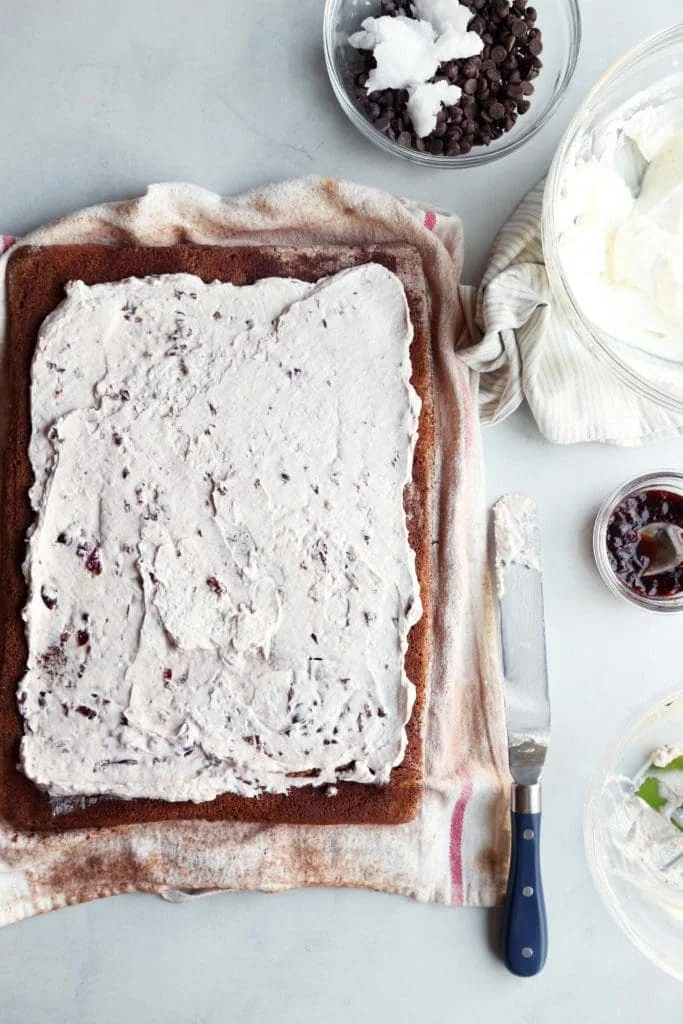
Take a deep breath and unroll the cake. Spread generously with the cherry filling until it almost reaches each edge of the cake. The filling should be about 1/2-inch thick.

Using the towel to help you, re-roll the cake. Be gentle. It’s ok if your cake cracks a bit – we’re going to cover it all with more cream.
You’ve done it! That was all the hardest parts!
Pat on the back for you!
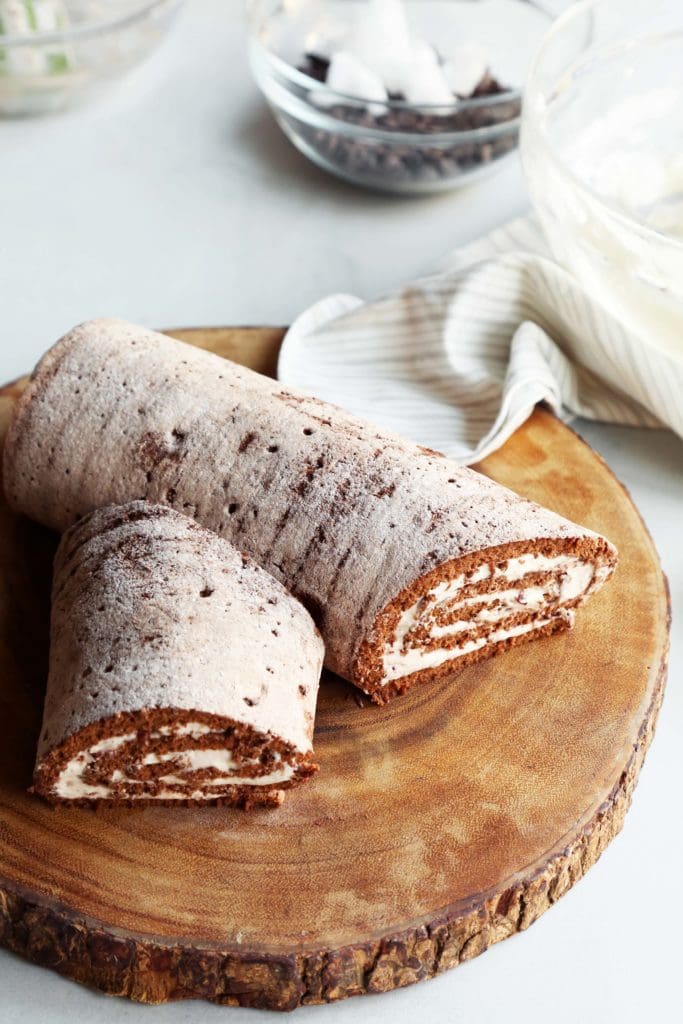
Slice a 4 to 6 wedge of one end of the cake and place it to the side like a split log.
See what you did there? It’s all coming together.

Top the cake with the remaining whipped cream.
Use the tines of a fork to trace bark-like marks in the cream.
Chill the cake while you prepare any other decorations.
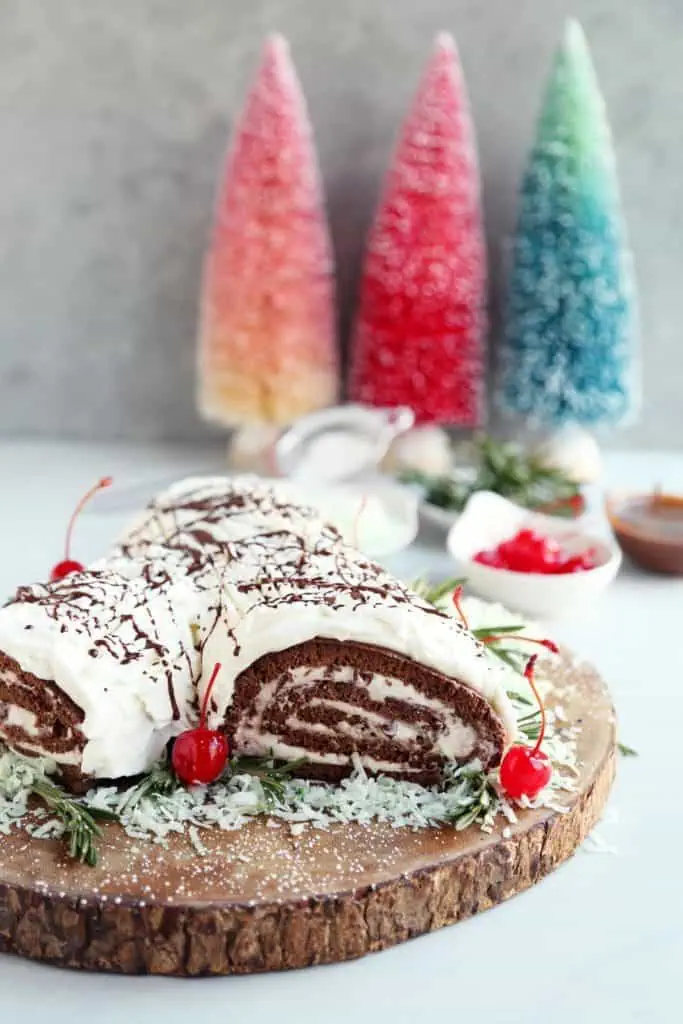
You’re welcome to finish your cake any way that feels sweet to you.
I tossed a shredded coconut with a dash of green food coloring. I splattered my cake with chocolate melted with coconut oil. I added maraschino cherries (though you could add sugared cranberries) and a few sprigs of rosemary. More is more. Make yourself happy.
You’ve got this! Let me know how your yule log recipe turns out! Happy holiday caking to you!
Photos with Jon Melendez.
Print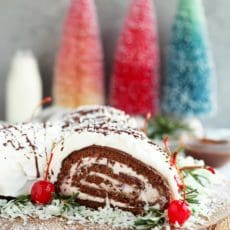
Chocolate Cherry Yule Log Cake
- Prep Time: 2 hours
- Cook Time: 12 minutes
- Total Time: 2 hours 12 minutes
- Yield: 1 8-inch cake 1x
Description
A classic holiday cake to make the Yuletide bright – with chocolate and cherries.
Ingredients
For the Cake:
- 6 large eggs, separated
- 1/4 teaspoon cream of tartar
- 1/4 teaspoon kosher salt
- 3/4 cup (140 grams) granulated sugar, divided
- 3/4 cup (95 grams) all-purpose flour
- 1/4 cup (25 grams) unsweetened cocoa powder
- 1/2 teaspoon baking powder
- 1 teaspoon pure vanilla extract
- 4 tablespoons unsalted butter, melted
- 1/4 cup strong brewed coffee, at room temperature
- 1/4 cup powdered sugar + 2 tablespoons cocoa powder for dusting
For the Filling and Frosting:
- 2 teaspoons unflavored gelatin
- 2 tablespoons water
- 2 cups heavy cream, chilled
- 1/3 cup (35 grams) powdered sugar
- pinch of kosher salt
- 1 teaspoon pure vanilla extract
- 1/2 cup frozen cherries, thawed, drained and thawed
Optional toppings and decorations:
- 1/2 cup chocolate chips melted with 1 1/2 tablespoons coconut oil
- maraschino cherries
- fresh rosemary or fresh thyme
- shredded coconut tinted with green food coloring
Instructions
- For the cake: Preheat the oven to 350 degrees F. Spray a 13-by-18-inch (a half sheet pan) rimmed baking sheet with nonstick cooking spray. Line with parchment paper and spray the parchment. Set aside.
- In the bowl of an electric stand mixer with a whisk attachment, or in a medium bowl with electric hand beaters, beat the egg whites, cream of tartar and salt until frothy. Add 1/4 cup granulated sugar and beat on high speed until stiff, glossy peaks form, about 2 minutes.
- In a separate medium bowl, sift together the flour, cocoa powder and baking powder. In a separate medium bowl, combine the egg yolks, the remaining 1/2 cup sugar and the vanilla. Beat with a whisk until thick and creamy, 3 to 4 minutes. Beat in the melted butter and coffee until combined.
- Add the flour mixture to the yolk mixture and whisk until well combined. Fold 1/3 of the beaten egg whites into the batter until no streaks remain. Gently fold in the remaining egg whites in thirds until combined.
- Transfer the batter to the prepared pan, gently spreading the batter so it fills the corners of the pan with an offset spatula. Give the pan a little shimmy to try and make the batter as even as possible across the pan. Bake until the top just starts to spring back when gently pressed, 10 to 12 minutes (the top might still feel a little tacky but that’s normal). Try not over bake the cake or it will crack. Allow the cake to rest for 5 minutes. Use the offset spatula to gently loosen the edges of the cake from the pan.
- In a small bowl stir together the powdered sugar and cocoa powder. Transfer to a sifter. Place a clean dish towel on a large wire rack. Dust the towel with half of the powdered sugar mixture. Turn the powdered towel over onto the top of the cake and gently place the rack on top of the towel that’s on top of the cake. Gently invert and carefully remove the parchment. Dust the top with the remaining powdered sugar mixture.
- Starting at one of the short side sides, use the towel to tightly roll up the cake with the towel inside. Position the cake seam-side down and let cool completely.
- To make the whipped cream, in a small bowl combine gelatin and cold water. Let stand until thick and set.
- Microwave gelatin mixture until it dissolves into a liquid. It should only take a few seconds. Allow to cool slightly but not set. It if sets, we’ll microwave it again.
- Place the cream, powdered sugar, and salt in the bowl of a stand mixer or in a medium with electric hand beaters and whip the cream until it just begins to thicken. Slowly beat in the liquid gelatin and vanilla. Increase the mixer and whip the cream until stiff.
- Place just over half of the whipped cream in a bowl and stir in the chopped cherries.
- To assemble the cake, carefully unroll the cooled cake and spread evenly with the cherry whipped cream, leaving a 1/4-inch border on all sides. The filling should be about 1/2-inch thick. Re-roll the cake, using the towel to help you.
- Slice 4-6 inches off one end of the cake on a diagonal and set it next to the cake like a split log. Use the offset spatula to coat the outside of the log with the remaining whipped cream, making line with the tines of a fork to create the look of bark. Chill while you assemble the decorations.
- To decorate melt chocolate and coconut oil. The mixture should be thin enough to splatter across the cake. Use a spoon and flick your wrist to splatter chocolate over the cake.
- Decorate the cake with cherries, fresh herbs, or candies.
- Store in the refrigerator until ready to serve and up to 3 or 4 days.
Notes
You’ll notice gelatin in our whipped cream filling and topping. Adding gelatin to whipped cream helps stabilize it, making it more sturdy as a filling and topping. It give the cake a longer life in the refrigerator, too. If you’re opposed to using the gelatin, no problem – you can leave it out, just serve this cake within a day of assembling.


21 Responses
A MOST amazing cake… each year I make a Yule Log cake and put a 1/4 cup of rum in the cake batter instead of coffee. ( Why not it’s Christmas !! ) The cherry whip cream filling will be a big hit, I know. Keep doing what you do Joy, you are a true inspiration to us All…
Health, Happiness, Love
Suzy
Of course I have a Baking Bucket List, and you better believe a Yule Log cake is on there! Lol.
Looks delicious (and beautiful)!
Learning to make a yule log is definitely on my baking bucket list! Quick question: will a 12×18 pan work instead of a 13×18? I’m concern about cake batter overflow lol.
I’ve baked in both of those pans with success!
how much fun, love this, thank you!
I’ve never made one of these and to be honest it sounds daunting (the rolling and un-rolling oh my!) but I am inspired to try! Writing it onto my Christmas baking bucket list right now…
Possibly an odd question, but would it still work taste good if I made most of the log (up to filling with cream and rolling stage) the day before and then covered with cream the day of eating? Would the cake dry out? Thanks ?
I think if you covered the cake well with plastic wrap in the fridge before frosting it you should be good to go!
Joy once again succeeds in creating beautiful yumminess. Thank you thank you.
Tried it…ate the whole thing! Now I have to make another one for the holidays (oh darn!)…I will wait until the day before though! Fantastic, as always. Happy Holidays to you and Tron and your family…best wishes for good health, much happiness in the new year
I’m so so happy for you!
I don’t drink coffee and hate the flavor. What do you suggest I use as a substitute? The cake looks so lovely!
Just water would be fine!
I made this last year during one of your online classes and there was an option to make chocolate icing. I can’t remember how to do that, though! Is it just a matter of adding in a bit of cocoa or would what be disastrous?
These look so delicious and tasty! I can’t wait to give this recipe a try! So excited!
If I’m real careful, any chance this could travel a couple of hours, along with drop-off goodies for grandmas this Christmas?
If you’re real careful and you stabilize the whipped cream, I think Yes! I’ll say a little prayer for you too. :)
Just want to say that this worked out great! Thanks for the inspiration and happy thoughts!
This recipe was delicious! A yule log cake was on my list of things to try baking and I had so much fun making it and was so impressed with the end result. The rolling of the cake was a little daunting, but it turned out great and was so yummy! Thanks for sharing this recipe!
Me and mummy were planning this tyoe of cake for NYE and here comes the recipe, thank you!!
Have you ever made this cake and froze it? If yes should I freeze before frosting?