
Hello friends!
One of the most satisfying hobbies I’ve taken up this year is making paper flowers. If you follow me on Instagram, you’ll see them speckled throughout my life. I’m playing with everything form dainty tissue paper roses to grand and sculptural magnolia flowers.
Most recently I’m making crepe paper poinsettia flowers to decorate my Christmas tree. Poinsettias naturally come in a surprising array of pinks, creams, and salmons that feel more fresh and have more depth and variation than the traditional red flower.
Together with my personal paper flower guru, Suzonne Stirling, we’ve put together a crepe paper poinsettia tutorial for you.
Here are some things to keep in mind if this is your first dip into the paper flower craft:
• it’s addictive- making something so beautiful from humble paper
• like anything new, paper flower making feels foreign and daunting at times- but anything beautiful is worth working through.
• don’t feel like you have to buy every paper on the list below. One or two colors for the bracts (these are what poinsettia petals are called) and two colors for the center
• get a friend in on this hobby too! It’s great to share supplies and spend time doing something new together!
Here’s how this tutorial goes:
- First we’ll gather our materials
- We’ll prep our paper by speckling or striping it with alcohol ink (optional)
- We’ll make the flower centers
- We’ll cut, glue, wire and assemble our bracts
- We’ll assemble the flower
- We’ll celebrate our new talents

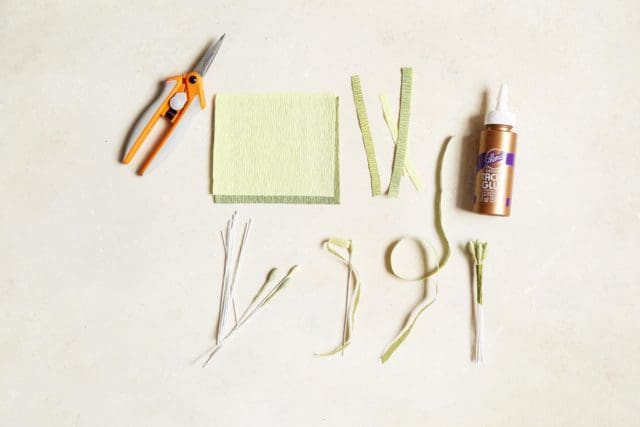
Materials:
180 gram crepe paper in desired color palette* – see links just below
22 and 24-gauge, white cloth-covered floral wire
18-gauge, green cloth-covered floral wire
Self-adhesive floral tape in light or moss green
Wire cutters (or old scissors you don’t mind dulling)
Optional Materials:
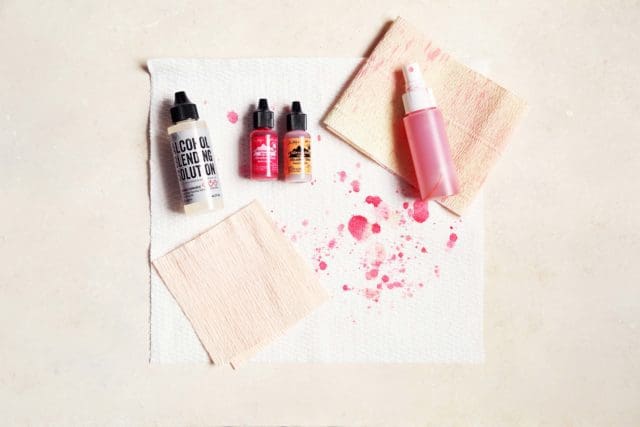
Alcohol Ink in Watermelon for speckled paper, Watermelon and Peach Bellini or Salmon for striped paper
Rubbing Alcohol
Alcohol Ink Blender
Small spray bottle
Plastic garbage bag
Paper towels
*Good colors for our palette – choose a few colors you like.
Bracts (what we think of as petals):
Cyathia (the center flowers):
Directions:
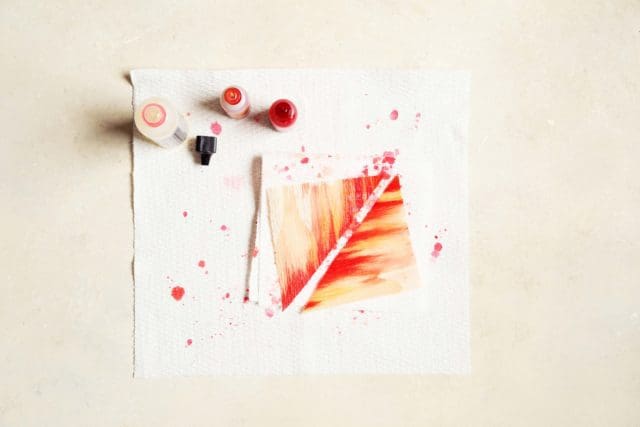
Prep for Speckling Paper:
If you plan to speckle your paper, you’ll want to do that in advance of cutting out the bracts. To prepare your ink, add a small amount of alcohol ink to the spray bottle and add rubbing alcohol. (Start with 1 part ink to 2 parts rubbing alcohol. You can further dilute it if desired.) Gently shake to mix.
Unroll your crepe paper and cut a piece from the roll that measures approximately 10 inches wide. Gently stretch it out horizontally (you want to keep some of the texture in the paper, so don’t force it). Lay it over the garbage bag.
Mist the paper with the diluted alcohol ink. Spraying farther away will result in a finer layer of color while moving closer will give you greater concentrations of color and/or drips and speckles. I generally start with a fine misting overall, then move in closer to get those irregular patches and spots.
Set aside to dry for a few minutes before handling.
**If you are not speckling your paper, you will still need to cut a piece of crepe from your roll, approximately 10 inches wide, and gently stretch as described above.

Understanding Grain:
Whenever I refer to grain, I’m talking about the direction that the fine lines in the crepe paper run. When handling and cutting paper, the grain should be vertical as shown above.
Step 1: Make cyathia (the center):
1 • Cut a piece of yellow and green crepe paper, each measuring about 6 inches long and 4 inches tall. With the grain of the paper running vertically, cut cross the grain of the paper, making strips that are about ¼-inch high.
Stretch those strips as far as they’ll go.
2 • Cut 22-gauge floral wire into pieces approximately 3-4 inches long (there is no need to be precise and will actually be easier to integrate into the main stem if they aren’t all exactly the same length).
3 • Starting with a yellow strip, dab a small amount of glue along the length of the paper strip and wrap around the tip of the floral wire, until it forms a ball or Q-tip shaped head (if you struggle with this step, you might find it easier to bend the top ¼-inch of the wire down onto itself and then wrap the crepe around that thickened loop).
4 • Once the yellow strip is wrapped, use approximately ½ of a green strip and wrap around the yellow, but leave some of the yellow peeking out at the top. Extend the green paper strip down onto the floral wire, about ½-inch below the bulb.
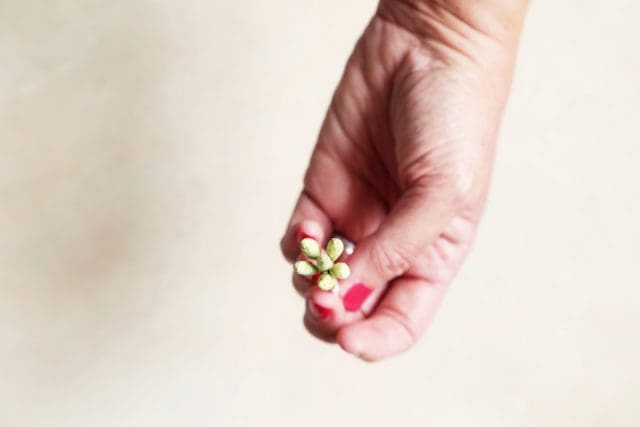 5 • Repeat, to make 6. Gather the pieces together and secure with a small amount of floral tape.
Shortcut for the centers: If you’d like to skip making the natural looking centers, there are ways to cheat. Look for small berry clusters in the craft store or use tiny wooden beads and gold floral wire (wrap a length of gold wire through the hole in the bead and twist ends together). There are no rules here. Use what you like!
Step 2 Make Bracts:
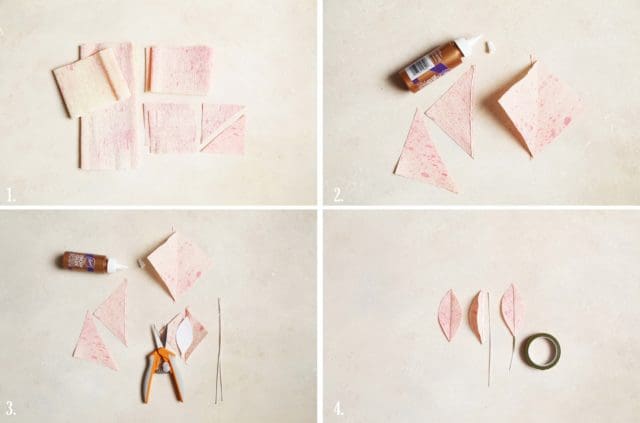
1 • With the grain of the outstretched paper running vertically (the fine lines of the crepe should be running up and down, not side to side), cut across the grain of the paper into strips that are 4 inches high. Then cut your strips into 4-inch squares. You’ll need approximately 16 squares for each poinsettia.
Group your squares into pairs, so that you end up with 8 sets. With right sides facing (painted sides facing inward) and the grain of the paper running vertically, cut through each set of two squares at once, cutting on a diagonal as pictured above.
2 • Take each triangle pair (right sides still facing) and add a thin line of glue along the straight edge of one triangle and layer the second triangle over it. Set aside until fully dry. Repeat with all pairings to end up with 16 glued triangles.
Tip: If this gets confusing, know that when the triangles are positioned correctly, the grain will be running in the same direction when they are stacked together.
When fully dry, fold open the glued triangles as shown. The grain of the paper should be running up from each side of the glued center (much like the veining on a leaf).
3 • With the grain of your paper running upwards, place your paper template over the opened triangle and cut around it.
Tip: There’s no hard and fast rule regarding the size or number of bracts on a poinsettia, but if you want to make one that resembles our model, cut:
2 Extra Small bracts
4 Small bracts
4 Medium bracts
6 Large bracts

4 • After you’ve cut out all of your bracts, place a line of glue along the fold in the back of each piece. Insert a short piece of white floral wire inside the fold and press to seal. (For the smaller sized bracts, 24-gauge floral wire is sufficient. The larger, bottom bracts will benefit from the heavier 22-gauge wire.)
Wrap the wire with a little bit of floral tape, from the end of the bract to approximately ½-inch below.
Set aside to dry before shaping the bracts.


Once the wired centers of your bracts have dried, you’ll want to give each piece shape and dimension. To do that, slightly stretch the paper up around the wired center, moving along the length of the wire on both sides.
You can also gently stretch the outer edges of the bracts in a few places (it will ruffle slightly) to create a sense of movement.
Step 3 Assembly:
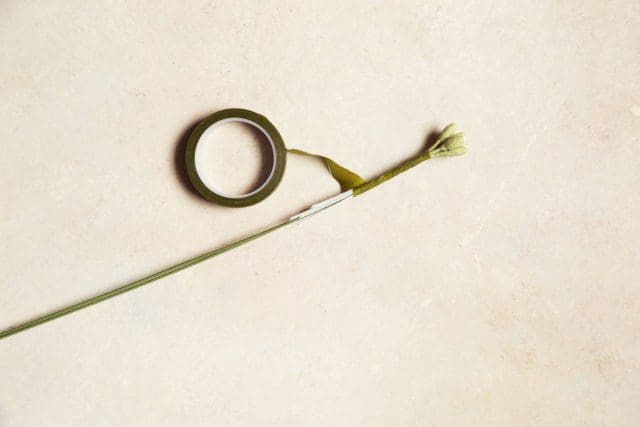
Place 2 pieces of the 18-gauge green floral wire inside the clustered cyathia. (I do this by pushing the wires into the center, into the taped area, until it feels secure.)
Tape all of the wires together to create one smooth stem.

Begin adding bracts as shown, using a small amount of floral tape to secure to the main stem. First row, 2 Extra Small bracts and 1 Small.
Note: Poinsettias are “leggy,” so don’t start taping too high up on the stem of the bract. You want to see some of the green floral tape that you added below each bract.

1 • 2 more Small Bracts, overlapping slightly, and taped about ¼-1/2-inch below the first row of bracts.
2 • Adding 1 Small and 2 Medium Bracts just below the second row of bracts.
3 • Adding 3 Large Bracts just below the third row of bracts.
4 • Adding 3 Large Bracts just below the fourth row of bracts to finish off. Wrap floral tape all the way down your stem to complete.
EXTRA TECHNIQUE
Striping:
Gather your supplies (crepe paper, stretched and cut into 4-inch squares – either solid or speckled; 2 or 3 colors of alcohol ink; alcohol blending solution; paper towels)
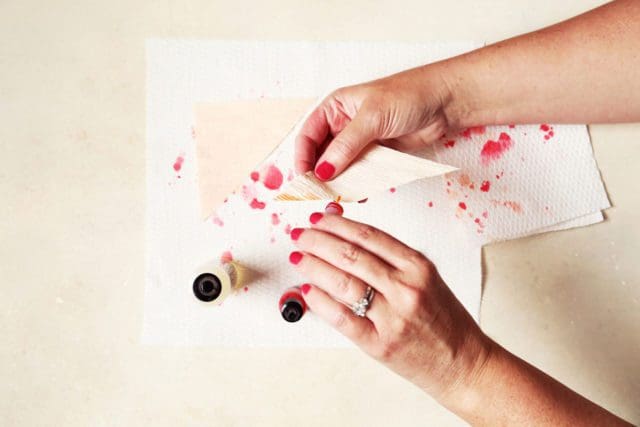
1 • Layer your squares and cut into triangles, just as you did for the speckled bracts. But before you glue the edges together, take the tip of the lighter alcohol ink and run it along the long edge of the triangle (squeezing the bottle gently, if necessary, until the ink starts moving across the paper).
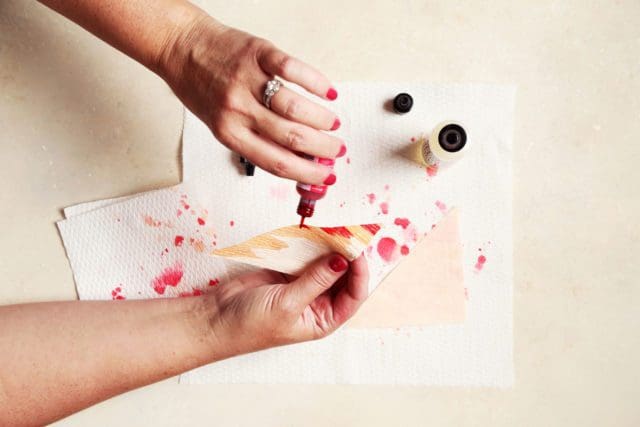
2 • Without waiting for the first layer of ink to dry, begin dabbing the tip of the Watermelon ink along the edge
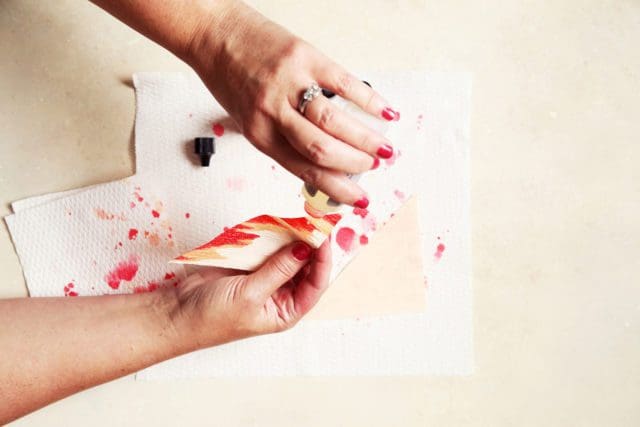
3 • With the ink still wet, squeeze the alcohol blending solution along the entire length of the triangle, until you see the colors start to bleed and blend together, traveling along the grain of the paper.

When both triangles are dry, glue them together as you did for the speckled bracts. When glue has dried, cut out the bracts and wire, as you did previously. During assembly, replace some of the speckled bracts with striped ones.
RESOURCES:
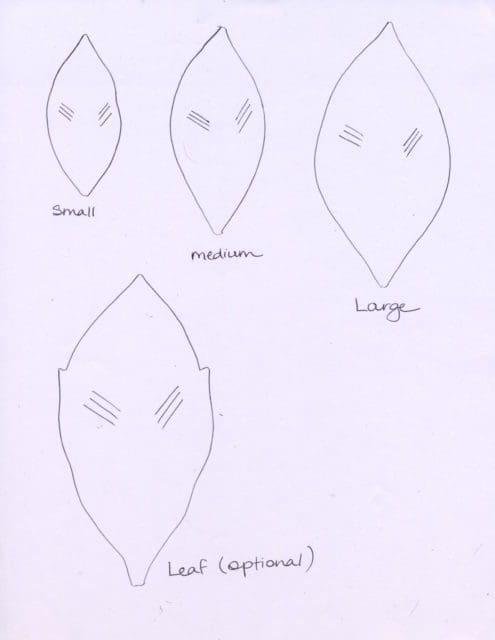
Bract and Leaf Template – You can use the above template to help you make bract shapes. These are meant to be a rough guide. Just trim the small bract even smaller for the few extra-small bracts. You could also look at a real poinsettia plant for shapes. We’ve included a leaf template which will come together in the same diagonal glue and fold method as the bracts. Right click on the template to save it and print.
Crepe paper – Peach paper is from Paper Mart. Other colors are available from Cartefini or Castle in the Air. These two retailers have different names for the shades of paper, so focus on the # that I’ve listed by the paper instead. Those are consistent across retailers.
Floral Wire – Floral wire is usually available at most craft stores, but not in all gauges. Paper Mart is a good source for all different gauges and colors and comes in various lengths.
Alcohol Ink – Tim Holtz Adirondack Alcohol Ink can be found through multiple vendors, but I find the best color selection at Create for Less .
Here are some inspiring books to help you along your journey:
The Exquisite Book of Paper of Paper Flowers by Livia Cetti
The Fine Art of Paper Flowers by Tiffanie Turner
Paper to Petal by Rebecca Thuss
But wait there’s more:
• An interview with Suzonne Stirling
• If you’d like to gather up a few friends and host a hands-on flower shop with Joy and Suzonne, check out The Bakehouse and shoot us an email: hello@thebakehousenola.com
Tutorial by Suzonne Stirling, photos with Jon Melendez.


18 Responses
Oh wow! These are so beautiful! Your tutorial makes it look so simple. Do you think I could sub using copic markers instead of the alcohol ink?
Yes! Same principle, but you might need more of the blender to get the ink to extend. Definitely worth experimenting with if you have it on hand.
How long do you estimate it would take a beginner to make a single flower? Can this been done in a couple hours? Or is it an all day project?
I would say a beginner would take 4 to 5 hours to complete a flower.
dang!
I have been looking for something crafty to do in my down time and this is perfect. Thank you Joy!
These are sooo beautiful! Can’t wait to play! Is there any chance of you two doing a tutorial on that rather amazing Magnolia?
Can’t wait to try to make these magnificent flowers. Loved the workshop last January with you both, and have since made magnolias and a tiger lily (yes, just one tiger lily, but it’s so dramatic). I have been looking for the next flower to try to make, and your tutorial came at a perfect time. Thanks!
These are gorgeous! I can’t wait to play! Any chance you two will be doing a tutorial on that rather amazing Magnolia??
Joy and Suzonne,
These are gorgeous!! I have been waiting for this tutorial and it is all and more than I hoped! Because of you two, I’ve been making paper flowers for several months now and have found it to be such a gratifying and relaxing hobby. It is almost meditative for me ( and addictive). My favorite ways to spend the weekend.. baking and flower making! Thank you.
Oh man, I do NOT need another hobby. But these are so lovely! I want to decorate my house with them, tie them to packages and make a wreath of them for my grandmother who’s can no longer care of live plants. I didn’t know I needed these in my life… but, I might need these in my life this Christmas season! Thank you! I think… ;)
This is amazing! In love with this DIY!
I saw crepe and poinsettia and I thought you had devised a magical way to make poinsettia crepes. So now I’m going to try to figure out what that looks/tastes like.
Whaaat! This is crazy! I have seen you posting about paper flowers on instagram but I didn’t realise they were quite so involved. These look so amazing though. I can’t imagine how satisfying it must feel to get one done!
I’ve received the supplies in the mail and will be starting today (day off from work) – wish me luck :)
You’ve got this!
Omgosh joy I’m so embarrassed it took me a whole year to actually do it but I just finished my first two!! They were a great adventure for today’s cloudy day :)
Paper Mart crepe paper rules! https://bit.ly/crepe-paper Glad you mention it.