I believe in our success as bakers. Our success means a lot to me. When you step in the kitchen with a recipe, I want you to come out with a masterpiece (and like, no dishes… but that’s not realistic). We are working within certain limitations when we step into our home kitchens. We (and I’m speaking from my own experience) have a limited amount of mixing bowls, two small oven racks, not nearly enough refrigerator space, and a quickly dwindling flour jar. It’s how we work within these limitations that influence the cake that comes out of the oven.
I’d love to share a few of my tips and tricks with you. It’s all about making our lives in the kitchen easier, packing the most flavor into our baked goods, and emerging from the kitchen with something totally stellar. No fancy proofing boxes, steam-injected ovens. My kitchen is humble, but supremely delicious (so I say).
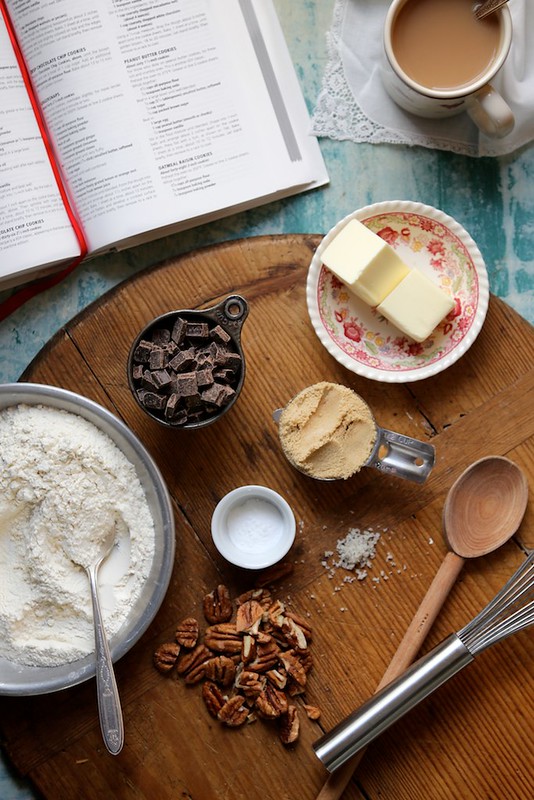
One: Let’s start where everything should start… with some good, old-fashioned mise en place. I wrote my very first (and mostly embarrassing) blog post about mise en place… that’s how strongly I feel about it. Mise en place is about having all of your ingredients prepped, softened, melted, sifted, and measured before you begin baking. It’s a great opportunity to check out your ingredients, and make sure you have everything you need before you get started. Don’t underestimate this step. There’s nothing worse than running out of buttermilk mid-recipe. A newly discovered, but very important part of my mise en place is the garbage bowl. So simple. Keep a large bowl (any bowl will do) on the counter and throw all your trashy loose ends in the bowl instead of walking back and forth to the trash can. Tracy introduced me to the garbage bowl. Game changed.
Two: Baking is a science. Sure, things need to be precise. Take yo time when baking. Take your time, and read the recipe. We’ve talked about this before. Baking 101: How To Read A Recipe
Three: Some recipes call for creaming butter and sugar. Here’s the deal, creaming butter and sugar means that you’re beating butter and sugar together (usually using an electric mixer with a paddle attachment) in order to aerate the mixture. For the best results, butter must be softened to room temperature. Cold butter will be too tough to aerate. Beat the butter and sugar for 3 to 5 minutes on medium speed. If the butter is at room temperature, after three minutes you’ll notice that the mixture is pale in color and slightly fluffy.
Four: Before the sugar gets creamed into the butter, consider whether or not your recipe has any herb or fruit zest. Rub the herb and/or fruit zest into the granulated sugar, releasing all of the essential oils. This will rub a different level of flavor into our baked goods. We’re adding major flavor to the sugar and that flavor will be distributed through our treats by way of butter. It a wonderful way to work things out.
Five: In the same way that we’re making the most of our lemon zest and herbs, we can also boost the flavor of out spices! Most recipes want us to stir our ground spices into the flour and leavening mixture. Nah…. if we beat the spices into the butter and sugar mixture, the flavors will be dispersed with the butter. Bonus: fat is great for transferring flavor.
Six: It’s really helpful to know a few baking equivalents.
3 teaspoons = 1 tablespoon
4 tablespoons = 1/4 cup
5 tablespoons + 1 teaspoon = 1/3 cup
2 cups = 1 pint
2 pints = 1 quart
4 quarts = 1 gallon
Seven: Have fun. Everything tastes better if you have a good time while making it. Don’t roll your eyes. That’s real! If you have any tricks you’d like to share from your kitchen, we’d love to hear them! Leave a comment below and share the wealth! xo.
Recourses I love:
The Joy of Cooking. This classic book has straightforward recipes using straightforward techniques. It’s a kitchen standard and you should totally have one. I find these books most lovely when handed down (all dog-eared and better stained) from your grandmother.
Keys To The Kitchen is a beautiful book by Aida Mollenkamp. It’s part technique encyclopedia and part recipe book. There are helpful graphics, super solid recipes, and really beautiful photography. I adore this book (and I’m sharing the Curry Chicken Soup with Roasted Peanuts recipe soon)!
Baking 101: How To Read A Recipe
Baking 101: Must We Sift This Flour?
Baking 101: Why We Use Unsalted Butter
Baking 101: The Difference Between Baking Soda and Baking Powder
Baking 101: The Difference Between Dutch Processed and Natural Cocoa Powder
Baking 101: Measuring Cups vs. Kitchen Scales


72 Responses
Great tips! I read all your Baking 101 posts and it’s very helpful. The articles are clear and concise. I love the way how you write. :) Anyways, I’m using garbage bowl every time I bake. Yay! Thank you again!
I have a recipe that calls for “2 teaspoons instant espresso”. Am I to use the espresso powder or am I to make the coffee and add 2 teaspoons? I am scratching my head over this one as I’ve never used coffee in a recipe before. Please help!
The powder is what they are looking for
Great Tips! I never knew 1/3 cup could be measured with Tablespoons and teaspoons!
Steps 4 and 5 are new to me. I’ll be sure to do them from now on. Your books are wonderful! I wish I had more time to bake.
Yes, I love the garbage bowl idea. Usually that is my sink-it’s within my tossing area. Thank you, Joy.
I noticed that you included in your pic of mise en place a lovely cup of coffee. That goes very well with baking! Gotta go get me one now . . .
https://www.afu.ac.ae/en/overview/
I wish that would happen!!! That would be great to come out the other end of a long day baking without any dishes.
Absolutely LOVE this page!!
Wow!thank you for sharing. I’m inspired and I believe God for a business in baking. Kindly send magazines or books you nay recommend to my mail
I am a terrible baker and I told my friends that I would bring a dessert to our Christmas Eve party. I liked that you pointed out that baking is a science, and you need to be very accurate with your measuring. It seems like ti would be best for me to just go buy something from a bakery.
Amazing! thanks for sharing helpful tips with us.
Great, thank you so much for sharing this information. I got to know so much from your post and I am very happy to come across this post of yours. Keep sharing such posts they are really very helpful.
P S. Place colander in sink so it can drain
I found Keys to the Kitchen section of this post tremendously helpful! Thank you so much for sharing so many great tips.
These tips are amazing.
Joy, this post is a baking treasure! Your mise en place advice and garbage bowl trick totally streamline kitchen chaos. I love your buttery sugar creaming tip and zest-enhanced flavors—pure magic. You prove humble kitchens can produce stellar results. Thanks for making baking approachable, joyful, and extraordinary